
There’s nothing better than a light, airy spin on a chocolate cake. Instead of worrying about layers with icing, making a sheet cake is more time efficient and tastes just as good with a topping of your personal choice.

There’s nothing better than a light, airy spin on a chocolate cake. Instead of worrying about layers with icing, making a sheet cake is more time efficient and tastes just as good with a topping of your personal choice.

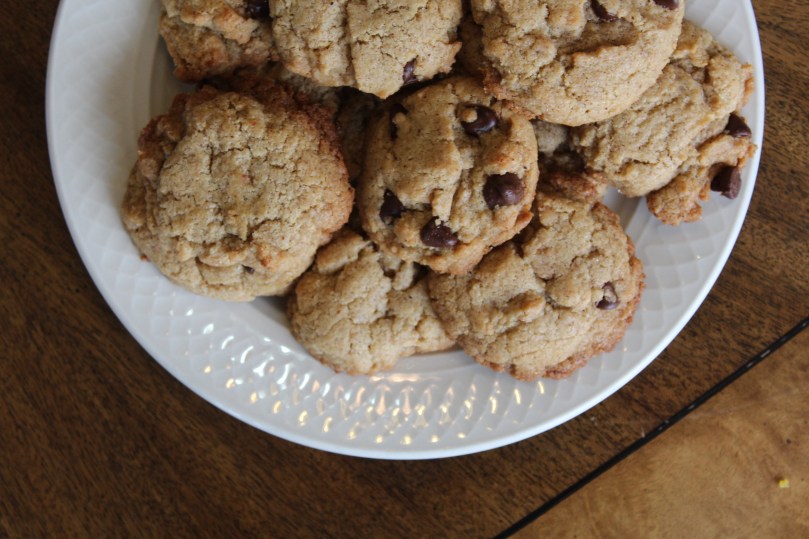
Flourless Chocolate Cookies are an awesome way to go gluten-free on cookies, without sacrificing the rich chocolate flavor and chewiness. They have an egg white base with powdered sugar instead of regular granulated sugar, and bake flatter, but taste delicious.

They are also very easy to make, and require that you only mix all the ingredients together in one bowl before baking!
Recipe below.
It’s More Than Just a Gift Card Pt. 2
Michael Metzler Jr.
.
With this card you can buy
Fireworks for the fourth of july,
TVs, games, and even a fly,
The one thing is, it can’t make you die.
.
But you can buy locks, dogs, and keys!
Cats, and worms, and sometimes fleas!
Ribbons, stuffing, ships and flags!
Hi-hats, teacups, big blue bags!
.
Drums and cymbals, and lo, the flu!
Socks and sleeves, and shirts for you!
Red and green and white and blue!
There is no thing this card can’t do.
.
So if you see this lying around
On a window sill, or, dare I say, the ground,
Do not hesitate, not for one minute,
For not a thousand bucks could win it.
.
It is a priceless piece of plastic,
Not anything on earth could buy it.
So do not drop, eat or discard.
I tell you true:
It is more than a gift card.


Flourless Chocolate Cake is an awesome way to go off gluten without even noticing! In fact, making a chocolate cake without flour allows it to be even richer, full of chocolate flavor, and very moist.
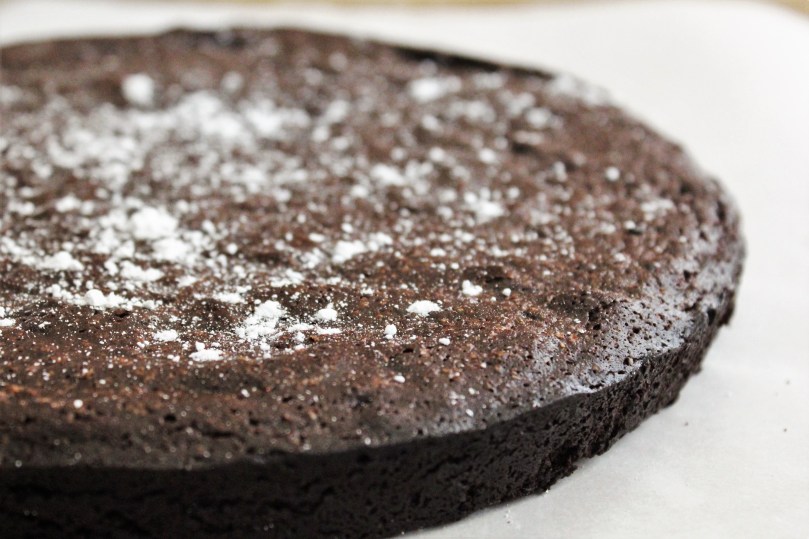
When you eat this cake, you don’t even feel like you are going off gluten, because it tastes almost like brownies, and it’s hard to believe that there are no grains whatsoever in it. You could even make it dairy free if you substituted coconut oil for the butter in the recipe.
This cake also allows the freedom to garnish with whatever you desire; fruit and caramel sauces, sprinkled with confectioners sugar, you name it. It is just as easy (if not easier) to make as regular chocolate cake and is just as rewarding.
So feel free to try it and let me know how it goes! (recipe below)
It’s More Than Just a Gift Card PART 1
Poem by Michael Metzler JR.
If you see this lying here
And see it littered far and near,
Do not question or dare discard;
I tell you: It’s more than just a gift card.
.
You can earn free drinks, and sometimes more,
If you bring it to the store,
But be specific, not any store will do.
It has to be the store that gave it to you.
.
Register this card for free awards
Register for boots and swords,
Register for lumps of clay
There are so many awards to get today.
.
For, this card can get you swirled
Coffee in a cup, and yes, the WORLD,
If you grasp the chance and dash,
And do not throw it in the trash.
.
It is plastic for good reason,
It can withstand many a season,
Biodegrade, it will not do,
But will remain just as your shoe.
.
Do not think, not for a moment,
That this card is an unnecessary component,
Do not wait, do not think,
With this, you can remodel–yes–your sink!
For Pt. II, see my next post! 🙂
Recipe below:


I realize this is my first post in a while, since I’ve been rather recently busy.
This summer I went to an AWESOME summer camp in the mountains. Generally, the food for every meal was amazing. This particular recipe I made, these “Chewy Chocolate Cookies with White Chocolate Chips,” were inspired by the cookies that were served one evening at that summer camp. My goal was to get them nice and chewy, and rich and chocolaty–very much like the ones at camp, and I think they turned out amazing.
The second time I made them, (and by suggestion of one of my friends), we added crushed Heath Bars to the mix and it tasted PERFECT. So feel free to do that as well, but it is purely optional.
So try them out; if you love chocolate, you’ll love these cookies!


These almond butter chocolate chip cookie treats are a great & easy way to snack.

The almond butter adds protein and fiber while the coconut oil adds healthy-ness and moistness. These cookies are just as easy to throw together as any other cookie, but are healthier in some ways…not to mention extremely delicious. Enjoy!


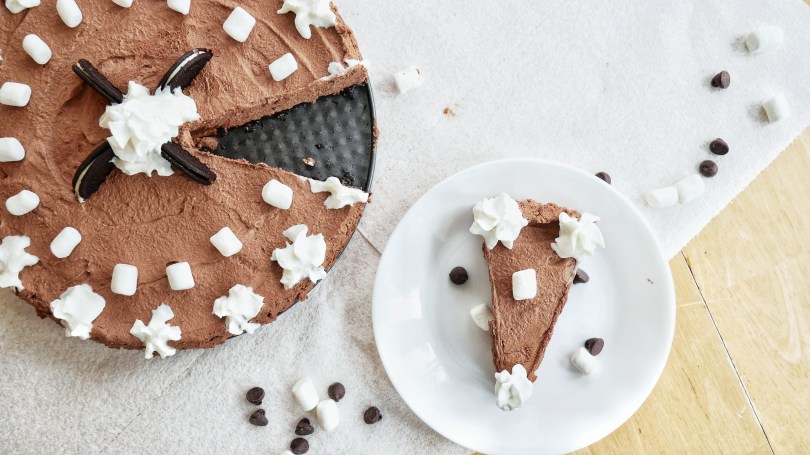
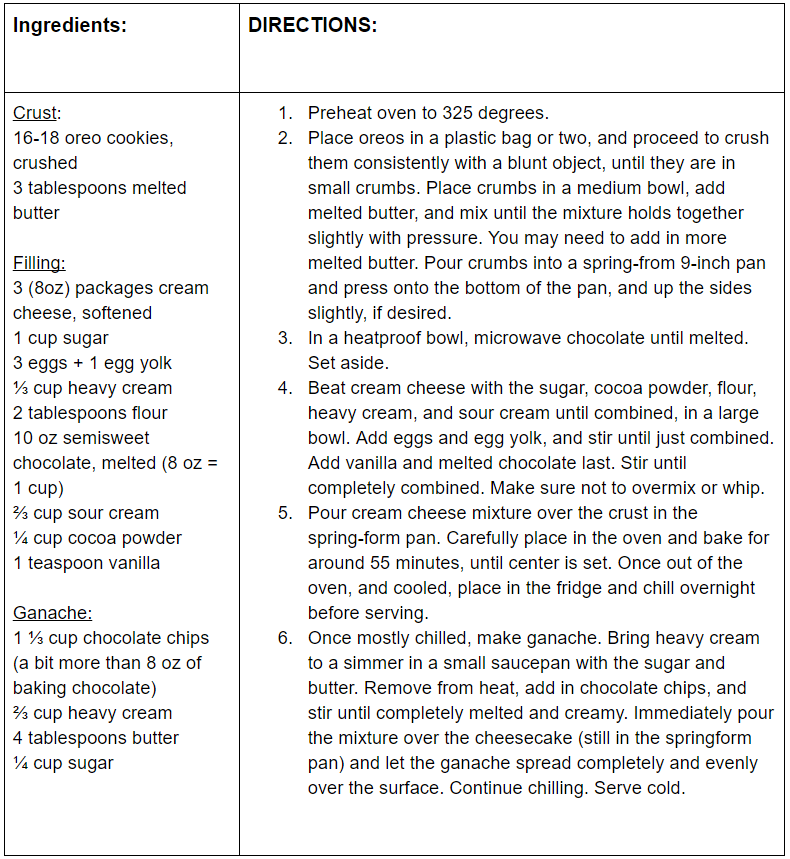
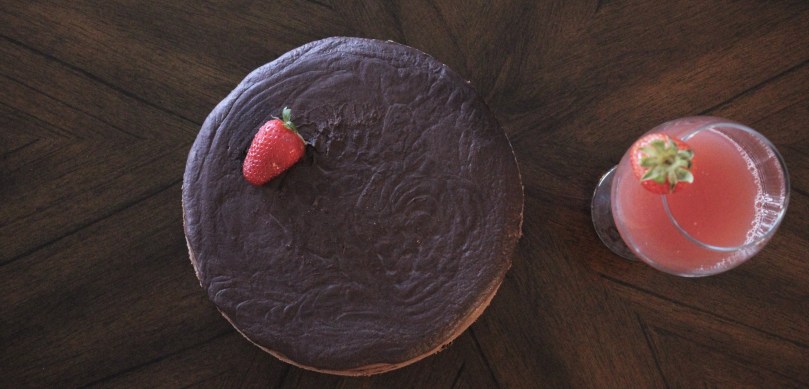
This Chocolate Cheesecake is packed full of rich chocolate flavor, accompanied with a homemade Oreo cookie crust, and topped with dark chocolate ganache.
I made this for an Easter 2017 party, but it is really good for any gathering on any occasion.

This recipe promotes chocolate as the most prominent flavor, so the type of chocolate you choose will be key in determining the outcome, or quality of the finished product. For my first time making it, it turned out just fine with semi-sweet chocolate chips. But obviously, there are many better and different options of baking chocolate out there.
In fact, I don’t necessarily recommend chocolate chips for baking. I would recommend quality baking chocolate, if you don’t mind the trouble. If you do mind, then chocolate chips work just fine.
I had the idea to make my own recipe for chocolate cheesecake when our friends invited us to their house for an Easter dinner. I knew they wanted something chocolatey, so cheesecake eventually sprang to mind, and with it came Chocolate.
It turned out great and received alot of compliments.
I hope you enjoy it too!


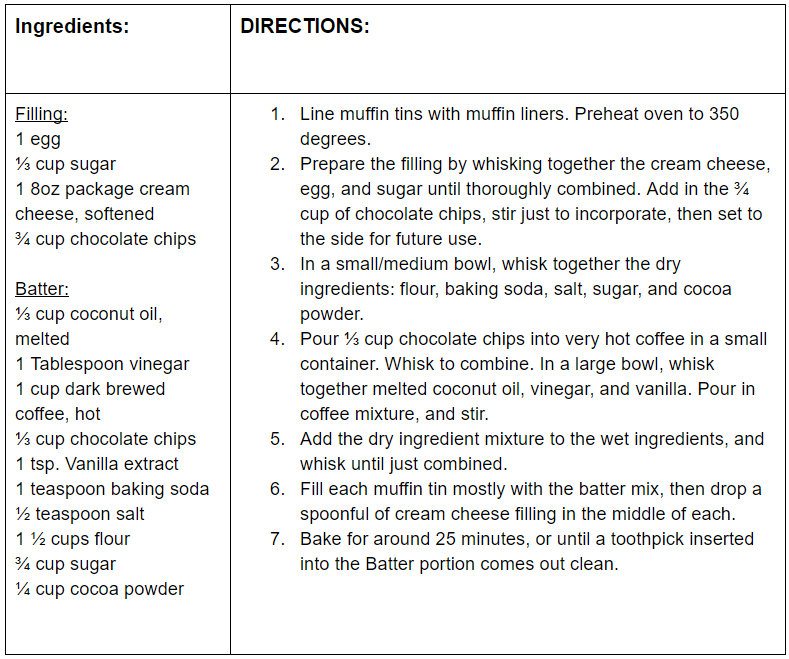
Black Bottom Cupcakes are a simple but delicious type of muffin; basically comprised of a chocolate-muffin base, then topped in the center with rich cheesecake filling. They satisfy chocolate lovers and cheesecake fans alike.

This recipe may be different than others in that I use coconut oil in the batter rather than vegetable oil. I recently read a Bon Appetit snippet that explained that coconut oil was better in chocolate cake than other options; that coconut oil in fact increases the moistness of the cake the longer it sits after baked, instead of drying out. So I thought that principle should apply to these muffins.
This recipe is also different from others in that I use melted chocolate chips in addition to the usual cocoa powder. I also used hot coffee instead of the usual water, and used the hot coffee to melt the chocolate chips in. Double purpose.
The result is a great combination of rich cheesecake filling with dark chocolate base, which rises beautifully in the oven, and tastes as delicious as it looks. See recipe below.
Enjoy! Also, for full step-by-step pictures, see my post of this recipe on instructables.

BLACK BOTTOM CUPCAKES RECIPE – – – – – – – – – – – PRINT


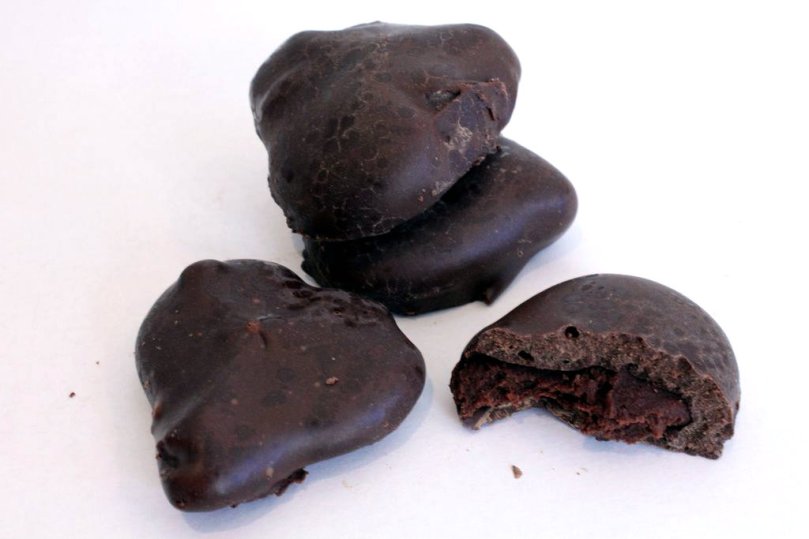
These raspberry heart chocolate truffles are the perfect candy/treat for Valentine’s Day. The outside is hard chocolate coating, and the inside is chewy soft raspberry chocolate. To complete that, they are shaped as hearts; but you can shape it any way you want.
Middle:
1/2 cup heavy cream
1/4 cup raspberry jam
1 1/2 cup chocolate chips
Coating; (if you don’t want to buy it)
DIRECTIONS:
In a small saucepan, heat the heavy cream and the butter until butter is melted and cream is at a slight simmer. Go directly to next step:
Pour the hot cream over the chocolate in a small bowl. (feel free to do variations on different kinds of chocolate; like milk chocolate, or whatever, as long as it is slightly sweetened). Let sit for a second, and then stir until completely smooth and melted.
Mix in the 1/4 cup of raspberry jam. You can also blend it with an immersion blender to make it smooth. Cool in fridge for half an hour or so.
This process will determine the shape of your truffles. And you can be creative here. I used a cookie press (i won from instructables) to press out the refrigerated chocolate cream on parchment paper.
This is purely optional; you can also roll the mixture out and cut out little hearts (no more than 1 inch wide) with little tiny heart cookie cutters when it is hardened. Or, you choose a different way. Ideally, you’ll have uniform little hearts (maybe even smaller than mine) that are easy to dip in the melted candy coating.
after shaping, place in freezer for half an hour before coating in next step:
Once perfectly hardened (in freezer is the fastest way), dip your chocolate centers into your melted chocolate candy coating.
1. First melt the chocolate candy coating in microwave, in a deep bowl. For easy dipping you should have about two cups worth of the candy coating.
2. I used two little toothpicks, and put them underneath the chocolate centers to hold them as they are dipped in chocolate. All you want to do is dip it straight in so that it gets completely covered in chocolate, and then take it straight out. Carefully place on parchment paper.
3. Store in an airtight container once hardened, preferably at room temperature.
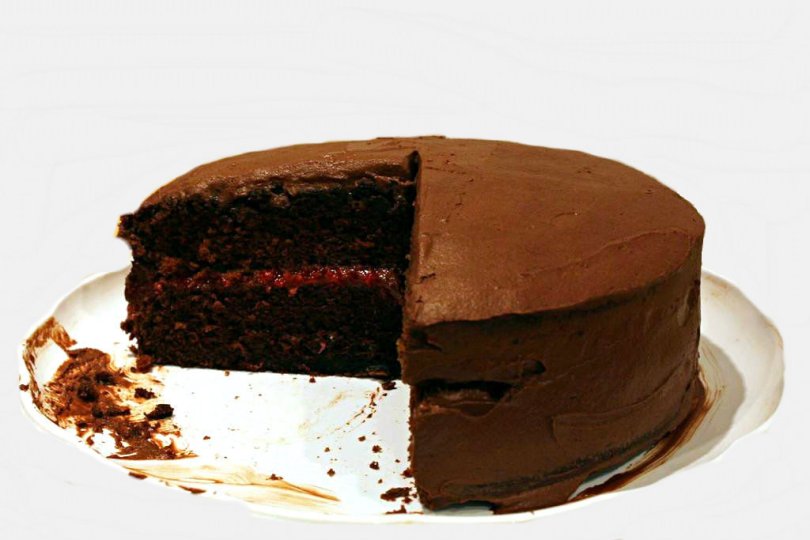
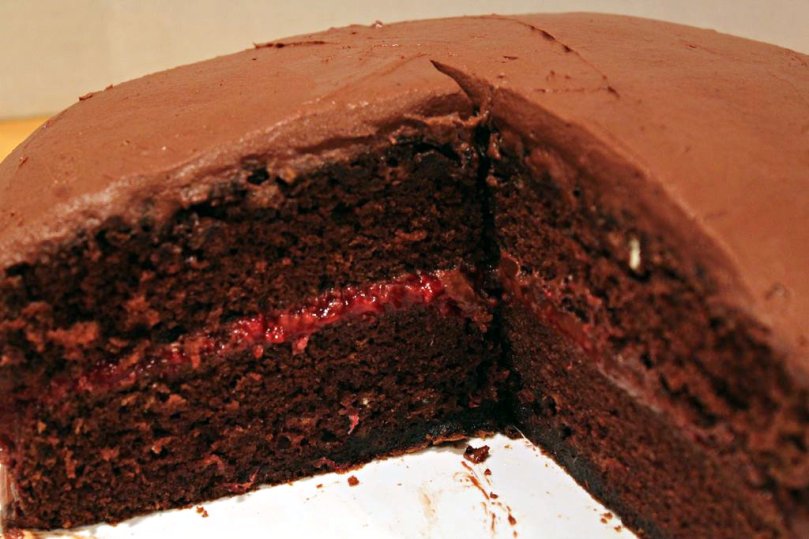
This rich chocolate raspberry cake is a great delicious cake for special occasions. The raspberry mixes perfectly with the chocolate. Raspberry jam mixture fills the middle of this cake, with not-too-rich, but delicious chocolate cake layering it, with chocolate raspberry frosting on the top.

Ingredients: (makes two nine-inch cakes for stacking)
BATTER:
1 ¾ cups all-purpose flour
½ cup chocolate chips
¼ cup cocoa powder
½ cup coffee, hot
1 ¾ cup sugar
1 teaspoon salt
2 teaspoons vanilla extract
1 ¾ teaspoons baking soda
4 large eggs + 2 egg yolks
½ cup oil
1 cup buttermilk
¼ cup butter, softened
FILLING: (Not shown in pictures)
1/2 cup frozen raspberries
1/4 cup raspberry jam
FROSTING:
1 cup chocolate chips (8 oz)
⅔ cup heavy cream
4 tablespoons butter
1 teaspoon vanilla extract
¼ cup sugar
1 teaspoon corn syrup
1 cup frozen raspberries
Grease and flour two 9 inch cake pans, and line with parchment paper. Preheat oven to 350 degrees.
In a saucepan full of water over medium heat, in an empty medium heat-proof bowl, pour hot coffee. Pour in the baking chocolate and cocoa powder and stir until chocolate is melted. Pour in sugar, and stir until it is dissolved. Mix oil in well. Remove from heat and set aside.
NOTE: this contraption (the saucepan with water in it, on medium heat, with a medium bowl on-top of the water) is essentially almost like a double boiler in the way that it works.
In a medium bowl, combine flour, baking soda, and salt. Set aside for later.
Prepare buttermilk for pouring. If you don’t have buttermilk, just use an easy substitute: In a measuring glass as shown, pour in one tablespoon of vinegar, and then fill the rest up with milk until it reads as 1 cups worth. Set aside.
This process is called ‘ribboning’ and is a way to make cakes light and fluffy in texture. Put in eggs and egg yolks into stand mixer, if you have one, and beat for a few seconds, until mixed up. Add sugar, and whip on high for a couple minutes, until the mixture is doubled in size, and light and fluffy.
Go straight on to the next step from here.
Now is the time to add everything you’ve prepared: Add the chocolate mixture and softened butter to the sugar egg mixture, and mix until combined. Do not whip. just stir slowly into it.
Then add flour and butter mixture alternately, first flour, then buttermilk, then flour, etc., ultimately starting and ending with the flour. Scrape the sides and keep mixing for a few more seconds, until just combined. Do not overmix.
Pour in equal amounts into the prepared cake pans. Bake in preheated oven (350 degrees) for at least 25 minutes, continually checking at and after the time said.
The cakes are done when a toothpick inserted directly in the middle comes out with only a few moist crumbs.
When cakes are done, turn them upside down on a cooling rack, taking off pan, and then flipping the cakes right-side up again. Let them sit this way to cool for around two hours before attempting to put the frosting on.
Place frozen raspberries in a microwave safe bowl, and heat in ten second intervals, mashing well in between until raspberries are just like puree (as shown in pic).
Mix these crushed raspberries with the raspberry jam, and set aside.
To make the raspberry juice, which will go in frosting:
using the same process described in the last step, mash frozen raspberries in between ten second intervals in microwave, until it is just juicy mash. Strain using cheesecloth or a sieve (cheesecloth is better) into a bowl to obtain the raspberry juice (bottom pic).
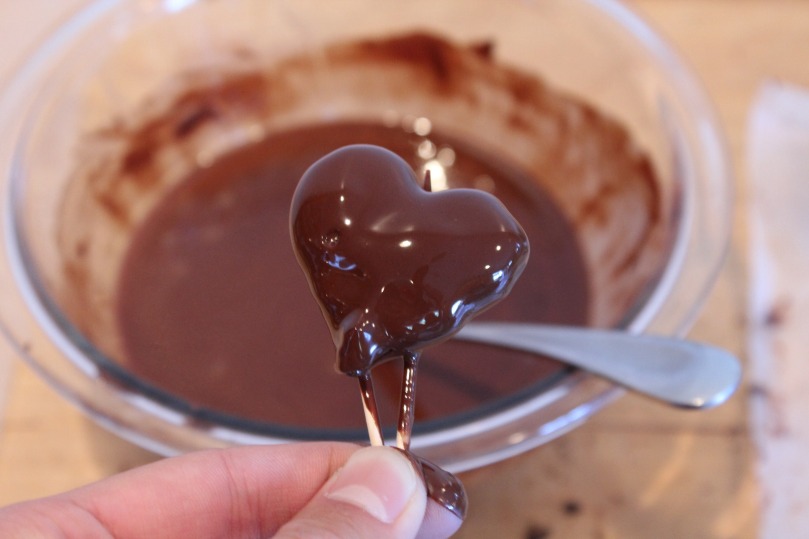
This process is very similar to making ganache, just a bit different, with a bit different ingredients.
Melt heavy cream and butter in saucepan, and bring to a boil. Reduce heat to low, and stir in sugar and corn syrup until sugar is dissolved.
Chocolate chips should be in a medium, deep heatproof bowl. Pour this hot heavy cream mixture over the chocolate chips, and stir until chocolate chips are melted.
Stir in the raspberry juice, and then place bowl into an ice bath, as shown above. Stir constantly until frosting is cold, and starts hardening to the sides.
Take out of ice bath, and whip with a beater until frosting is light and fluffy.
Go onto the next instructions immediately before it melts:
Start with the first layer of cake. Spread all of the raspberry jam mixture onto this layer. Then carefully put some of the frosting on top of this. Place the second layer on top of it. Then ice the rest of the cake, sides, and top completely with all the remaining chocolate-raspberry frosting.
A cake frosting knife as shown in pic is very helpful in this situation.
Refridgerate 20 minutes before serving
Store in fridge, completely plastic wrapped to keep it from drying out.
Here’s the link to my original post of this recipe on instructables.

For those of you who like making chocolate cake, and making waffles, why not do something new and put them together?

INGREDIENTS:

INGREDIENTS:
For the waffles: (makes 4-5 large Belgian waffles)
3 eggs
1 cup coconut milk
¾ cup warm coffee
½ cup chocolate chips, melted
½ cup vegetable oil
4 tablespoons sugar
1 ½ cups white whole wheat flour
1 cup all-purpose flour
½ cup cocoa powder
4 teaspoons baking powder
¼ teaspoon salt
¼ teaspoon vanilla
For Frosting:
1 cup chocolate chips (= 8oz baking chocolate)
⅔ cup heavy cream
4 tablespoons butter
1 teaspoon vanilla extract
¼ cup sugar
1 teaspoon corn syrup
DIRECTIONS:
Prepare a large Belgian waffle iron according to manufacturer’s instructions.
This is the one I used: Cuisinart Belgian Waffle Maker
In a separate medium bowl, combine flours, 4 tablespoons sugar, cocoa, baking powder, and salt.
Dump eggs, coconut milk, oil, and vanilla, into a large bowl.
Dump the dry ingredients into the large bowl with wet ingredients, and mix until smooth and incorporated.
Heat the coffee up in a microwave-proof dish.
Dump in 1/2 cup chocolate chips.
Stir until melted and combined with coffee.
Pour chocolate/coffee mixture into batter.
Mix until combined.
Cook batter in waffle iron, according to instructions. (With my waffle iron I used the no. 3 setting)
You should turn out with 4-5 large waffles. Optionally, you can use a small portion of left over batter: pour the small portion of leftover batter into one corner of the waffle maker. You can use this for decoration on the top of the cake later.
Heat heavy cream and butter in saucepan on medium heat until it just begins to boil. Make sure butter is melted. Return heat to low, and stir in corn syrup, and sugar, until sugar is dissolved. Add vanilla.
Pour hot mixture over chocolate chips in a medium metal bowl, and stir until chocolate is melted.
Place chocolate mixture in bowl in a ice bath, and stir until frosting hardens a bit. Take out of ice bath and whip with a beater until it is light and fluffy.
Don’t ice the waffles until they are completely cooled.
Place one waffle on a serving dish. Spread frosting thinly over it.
Place the second waffle down over, and spread frosting over that.
Do this with the rest of the waffles, spreading over the final part in a thin layer, not the sides.
Here’s where that extra optional waffle corner comes in: You can place it how you want to on the top of the cake on the icing. See picture.
Place in fridge for 15 minutes before serving.
NOTE:
There is not much icing for the waffles, which is why you should only do thin layers, and not over the sides. But if you want to, you can double the icing, and make it look more like a standard cake.
However, this look still looks good as you can see the sides of the waffles, and reduces sugar.
And that’s it! Thanks for reading, and be sure to also check out my original post of this recipe on instructables.


This chocolate fudge is a perfect homemade dessert to serve at parties or other large gatherings. Half the recipe and have enough for the whole family!

INGREDIENTS:

INGREDIENTS:
1 7oz jar marshmallow creme
1 cup butter
3 (12oz) packages chocolate chips
2 teaspoons vanilla
4 1/2 cups sugar
1 (12 fl oz) can evaporated milk
1 cup walnuts (optional)
DIRECTIONS:
Finely chop walnuts.
Throw chopped walnuts, chocolate chips, butter, marshmallow creme, and vanilla in bowl. If butter is unsalted, sprinkle in some salt.
Combine evaporated milk and sugar in a large saucepan, and bring to a boil, constantly stirring.
Once it has reached boiling, continue in the boiling stage for 15 minutes, constantly stirring.
Pour boiling sugar mixture into all the other ingredients in the large bowl.
Stir it all with a spatula until completely homogeneous.
Spread evenly onto a 9×13 glass baking dish.
Place in the fridge and cool for at least 4 hours before serving.
Consume moderately. Recipe not meant for small family. Share with friends and family as homemade gifts, or serve at parties or other gatherings.
For step-by-step instructions with pictures, visit my original post of this recipe on instructables

