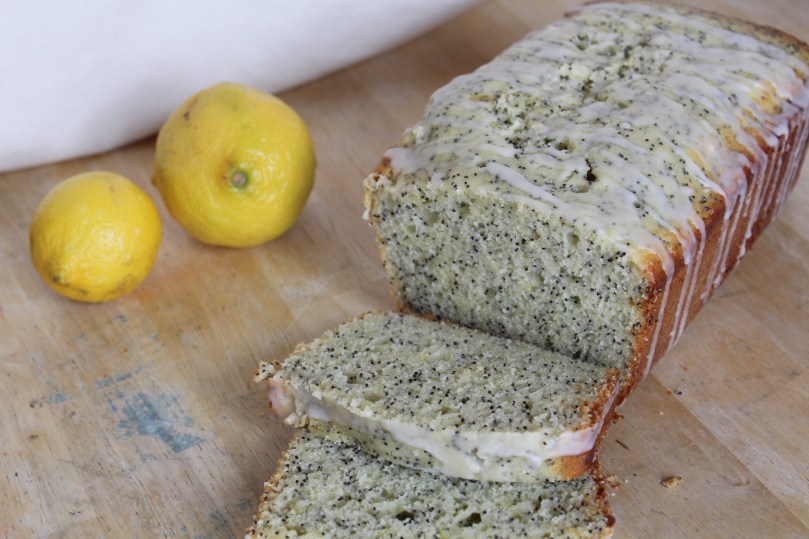
Lemon Poppy Seed Bread is an easy-to-make quick bread that tastes sweet and full of lemon flavor. It is a great summer dessert to make, made better with the addition of lemon glaze drizzled over the top.
Lemon Poppy Seed Bread Recipe — — — — PRINT


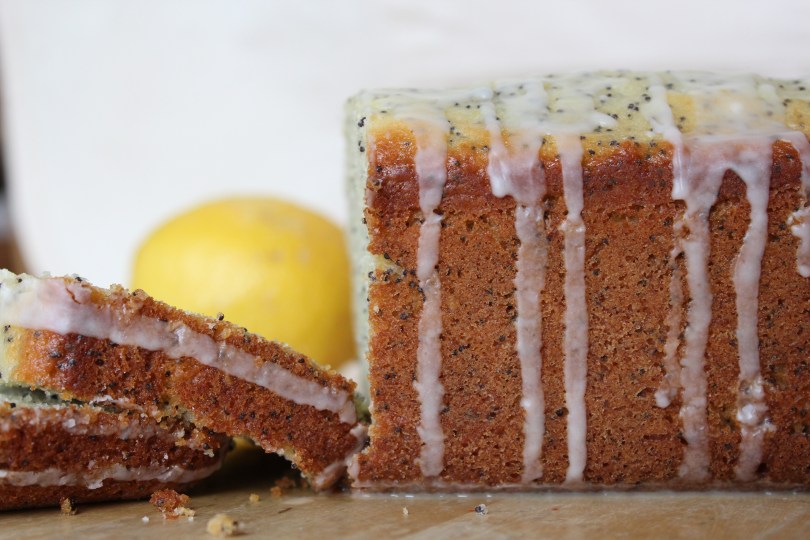
Lemon Poppy Seed Bread is an easy-to-make quick bread that tastes sweet and full of lemon flavor. It is a great summer dessert to make, made better with the addition of lemon glaze drizzled over the top.
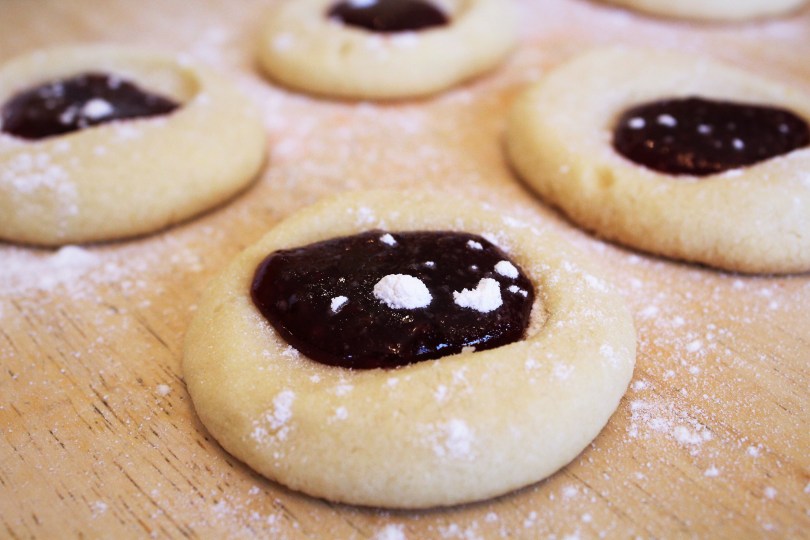
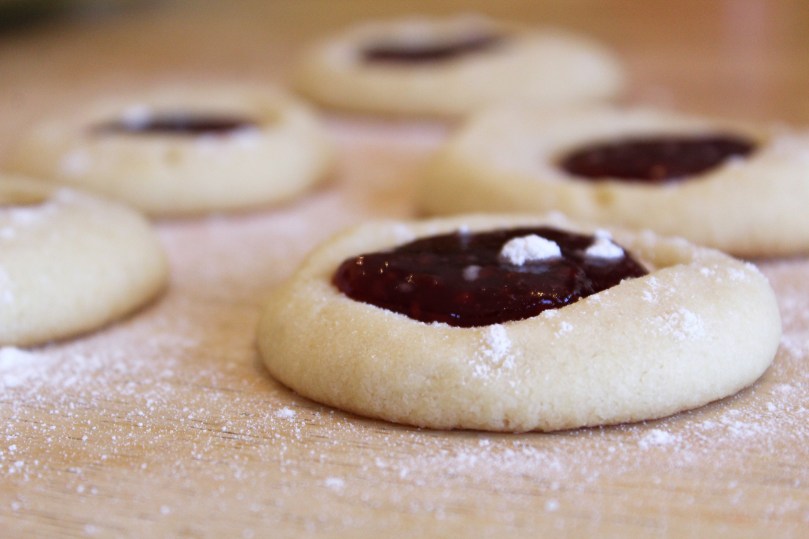
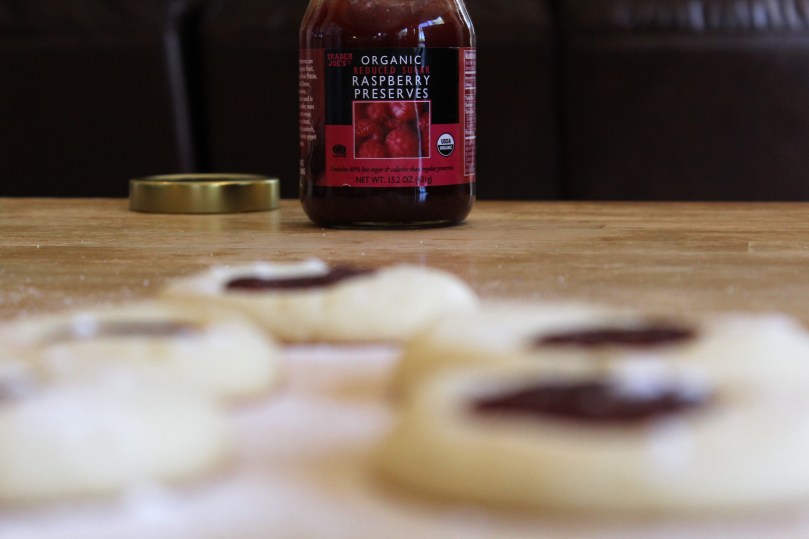
These Fruit-filled Thumbprint Cookies are quick & easy to make, and don’t require very many ingredients. The cookies are simplistic, consisting only of flour, butter, sugar, and vanilla. But put them together with fruit jam, and you add a whole other level of taste.
Serve with tea or enjoy anytime!


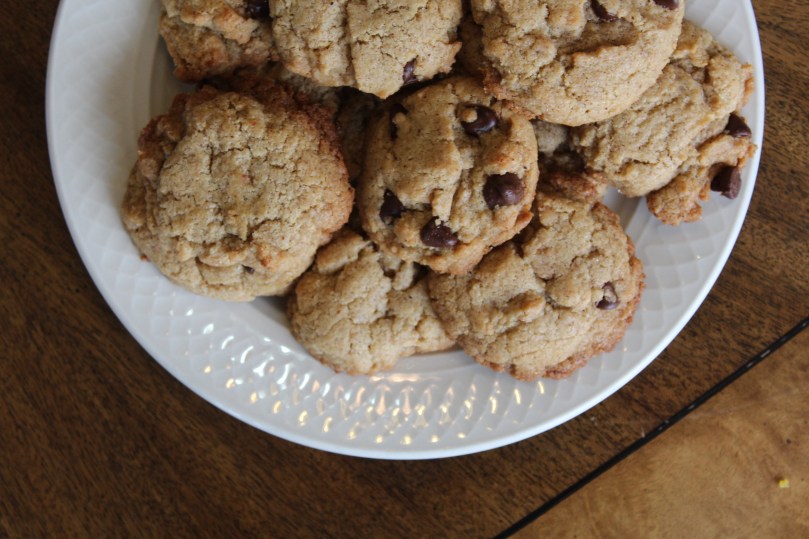
These almond butter chocolate chip cookie treats are a great & easy way to snack.

The almond butter adds protein and fiber while the coconut oil adds healthy-ness and moistness. These cookies are just as easy to throw together as any other cookie, but are healthier in some ways…not to mention extremely delicious. Enjoy!


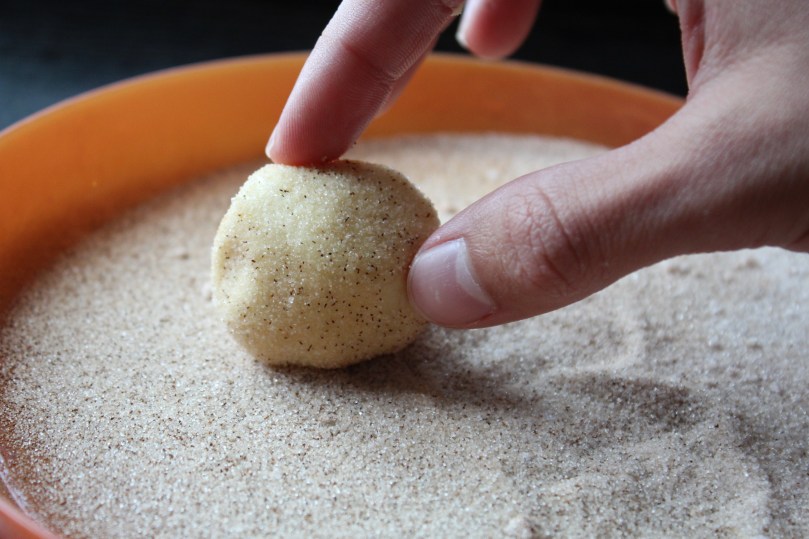
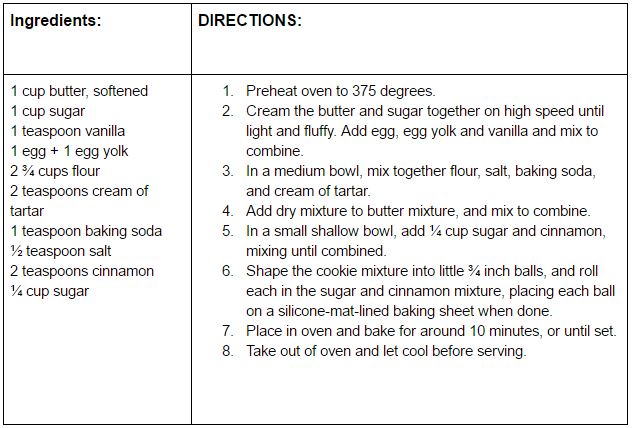
This is a quick & easy recipe for the classic soft snickerdoodle cookie. Serve as dessert with ice cream, or devour it simply as a snack.
Delicious balls of nostalgia rolled in a coating of excellence; serve with a cup of cheer and enjoy.

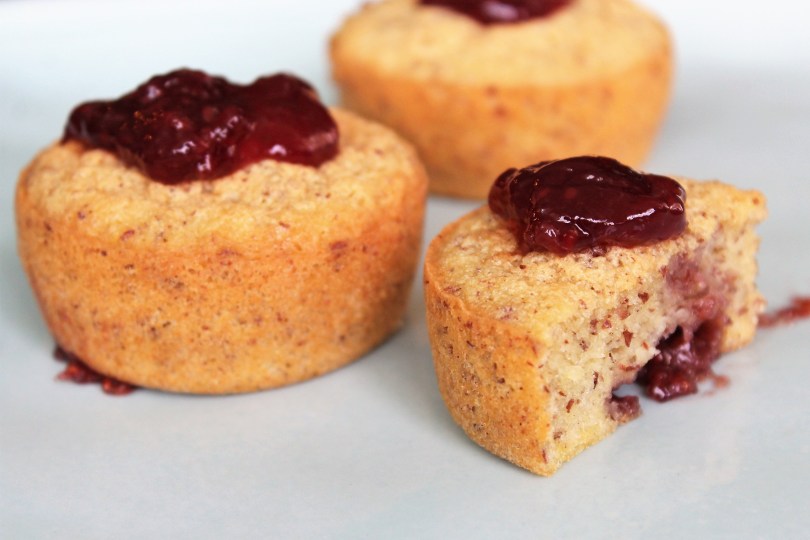
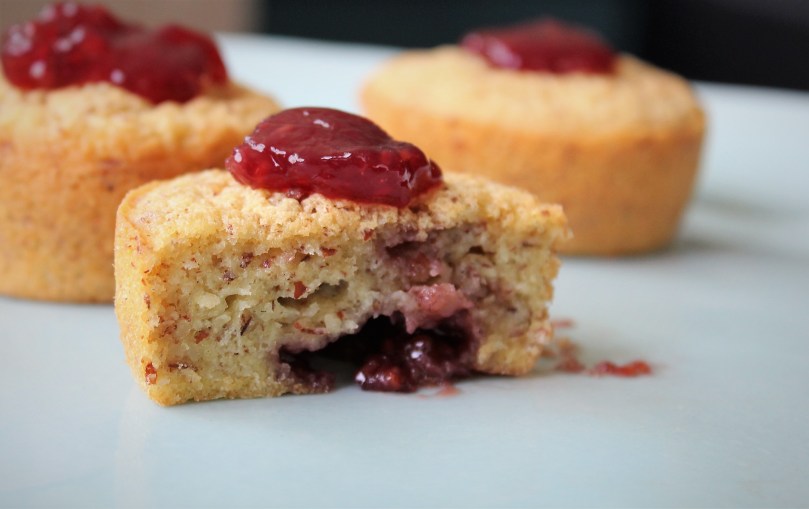
These Almond & Fruit Cupcakes are simple and fast to make, happen to be gluten-free, and hold very little sugar. This makes them quite versatile, and can be served primarily at breakfast, lunch, eaten even as an after-dinner light dessert, or just snacked on whenever (in moderation).
Enjoy with a topping of your favorite fruit jam.

I based this recipe off of the New York Times Food recipe for ‘Mini Almond Cakes’ which I really enjoyed but wanted to make my own recipe, and make it a little differently. I added egg yolks in addition to the usual fluffy egg white–but not before also fluffing the egg yolks with some confectioners sugar.
The cool thing about these Almond cupcakes is that they are automatically gluten-free, as they use almond meal instead of flour. They also do not use a ton of sugar and taste light, and go especially well with the sweeter fruit jam on the top. Enjoy!


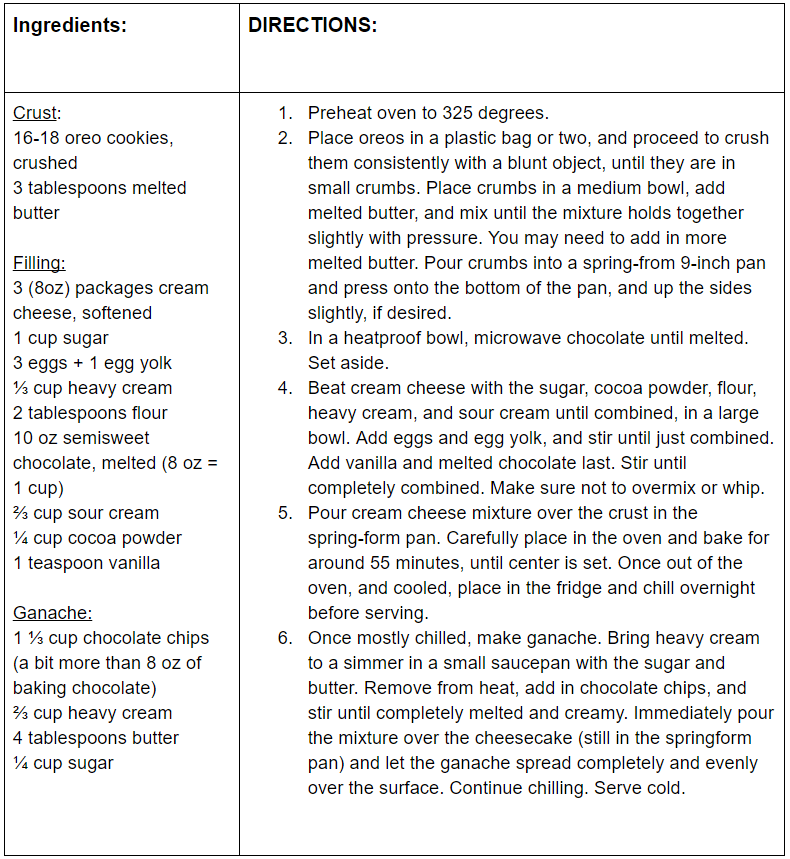
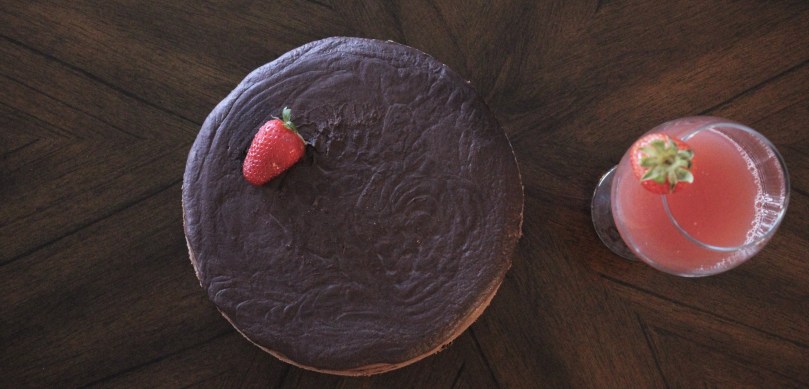
This Chocolate Cheesecake is packed full of rich chocolate flavor, accompanied with a homemade Oreo cookie crust, and topped with dark chocolate ganache.
I made this for an Easter 2017 party, but it is really good for any gathering on any occasion.

This recipe promotes chocolate as the most prominent flavor, so the type of chocolate you choose will be key in determining the outcome, or quality of the finished product. For my first time making it, it turned out just fine with semi-sweet chocolate chips. But obviously, there are many better and different options of baking chocolate out there.
In fact, I don’t necessarily recommend chocolate chips for baking. I would recommend quality baking chocolate, if you don’t mind the trouble. If you do mind, then chocolate chips work just fine.
I had the idea to make my own recipe for chocolate cheesecake when our friends invited us to their house for an Easter dinner. I knew they wanted something chocolatey, so cheesecake eventually sprang to mind, and with it came Chocolate.
It turned out great and received alot of compliments.
I hope you enjoy it too!


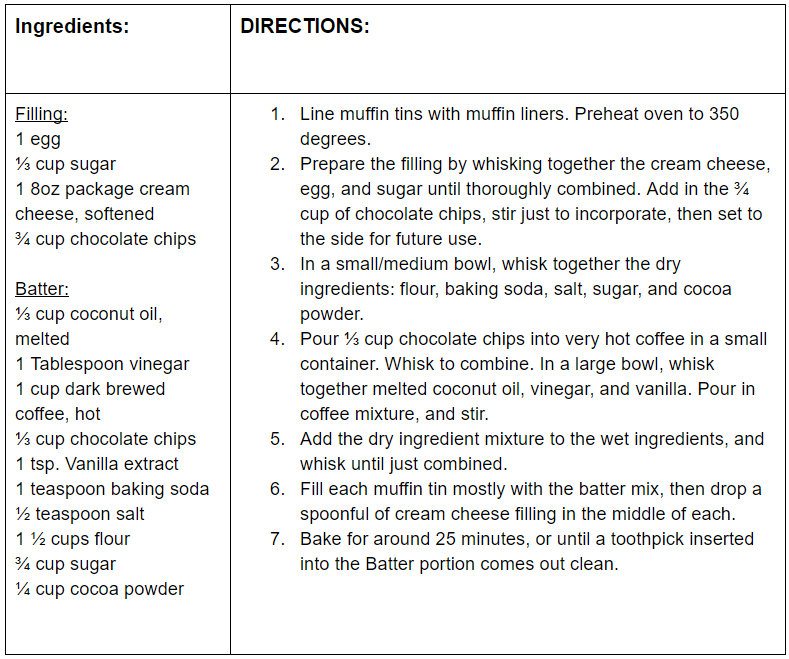
Black Bottom Cupcakes are a simple but delicious type of muffin; basically comprised of a chocolate-muffin base, then topped in the center with rich cheesecake filling. They satisfy chocolate lovers and cheesecake fans alike.

This recipe may be different than others in that I use coconut oil in the batter rather than vegetable oil. I recently read a Bon Appetit snippet that explained that coconut oil was better in chocolate cake than other options; that coconut oil in fact increases the moistness of the cake the longer it sits after baked, instead of drying out. So I thought that principle should apply to these muffins.
This recipe is also different from others in that I use melted chocolate chips in addition to the usual cocoa powder. I also used hot coffee instead of the usual water, and used the hot coffee to melt the chocolate chips in. Double purpose.
The result is a great combination of rich cheesecake filling with dark chocolate base, which rises beautifully in the oven, and tastes as delicious as it looks. See recipe below.
Enjoy! Also, for full step-by-step pictures, see my post of this recipe on instructables.

BLACK BOTTOM CUPCAKES RECIPE – – – – – – – – – – – PRINT


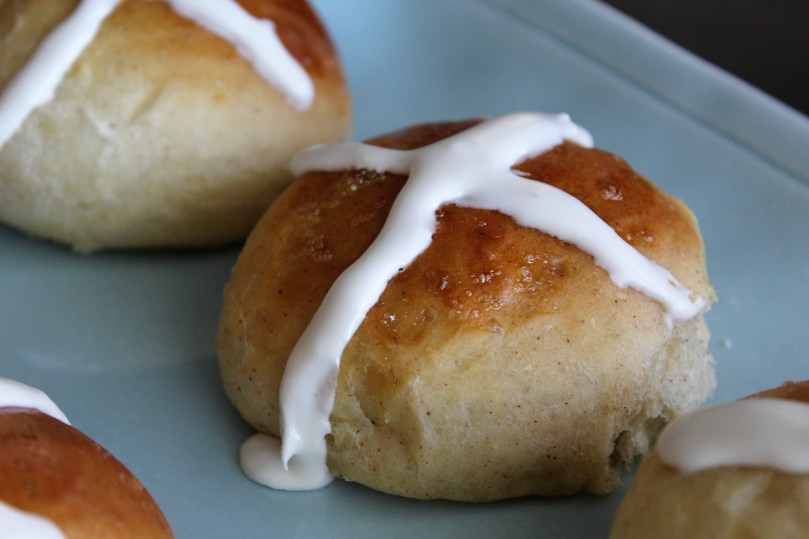
Hot Cross Buns are sweet bread rolls, traditionally made for Easter, and have icing drizzled in the form of a cross. The bread is moist with a hint of cinnamon.

This recipe is different from others because of the two egg yolks that are added to the dough. Make sure to save the 2 egg whites in two separate containers, though: you’ll need one for the icing, and one to spread thinly over the rolls just before baking them.
It makes around 18 rolls, but you can make them alot smaller if you want to serve them to a larger group of people. The balls of dough initially look small, but after their second rise time on the baking sheet, they should grow more than double in size, and get even larger in the oven. So don’t be fooled by their previously small appearance.
The ones in the picture (above) started at 1-inch balls of dough–so you can see how much larger they got.
Be sure to make these delicious rolls for your Easter celebration! And, although they are traditionally made for Easter, they make great rolls anytime of the year if you simply desist from adding the icing (WARNING: icing is a strong temptation). Remove the icing cross, and you have made these into multi-purpose baked goods.
Enjoy!

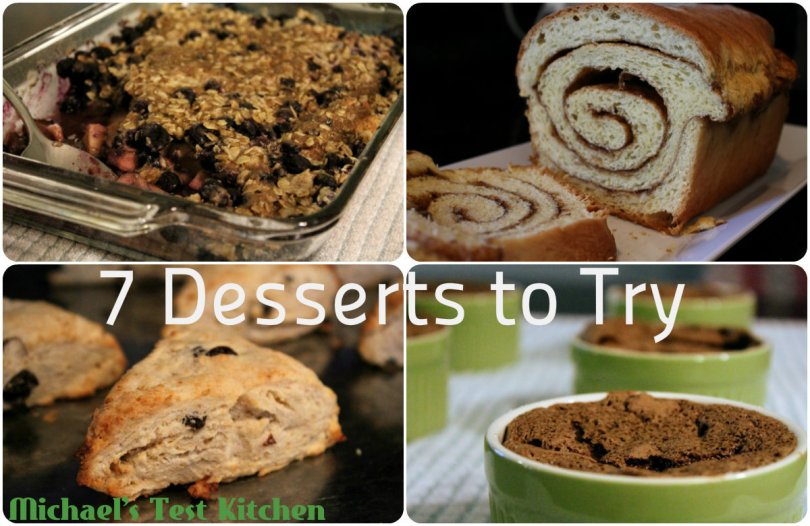
This post is basically me compiling 7 different desserts that I’ve tried and recommend. Some are my recipes, but alot of them come from different areas of the internet.

These souffles are probably the easiest gourmet dessert I’ve made; and they don’t take super long to make. The middle of these souffles are meant to be a very rich creamy chocolate. I recommend you make these souffles, especially if you love chocolate, and don’t mind buying the 6 oz ramekins needed for the recipe.
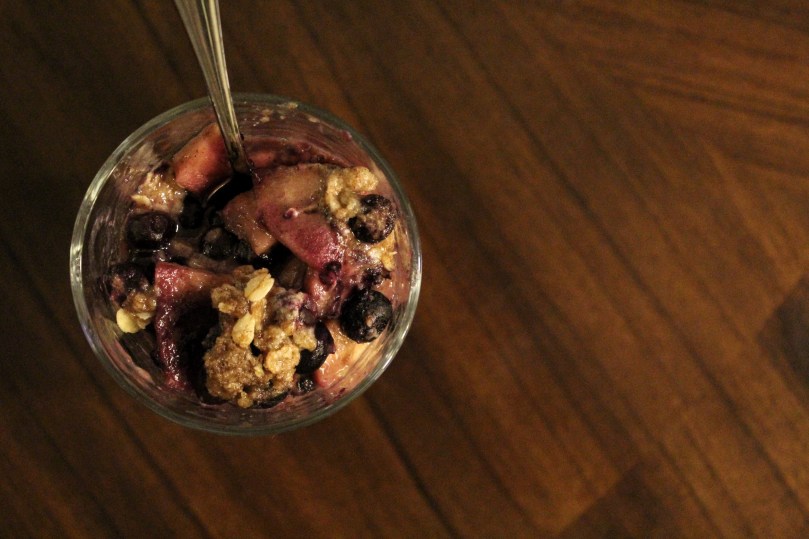
2. APPLE BLUEBERRY CRISP on Michael’s Test Kitchen

I actually just posted this recipe on my blog. It was inspired by the apple crisp by Tastes Better From Scratch, and both are great recipes. Blueberries add a dash of bright contrast to the autumn-colored apples, and it is good for serving at larger gatherings.
3. BLONDIES by America’s Test Kitchen

This is an America’s Test Kitchen recipe that I made, and I liked it. If you’re bored of the traditional chocolate brownies recipes, then make this and add butterscotch chips to the mix.
4. CHOCOLATE CAKE from Michael’s Test Kitchen
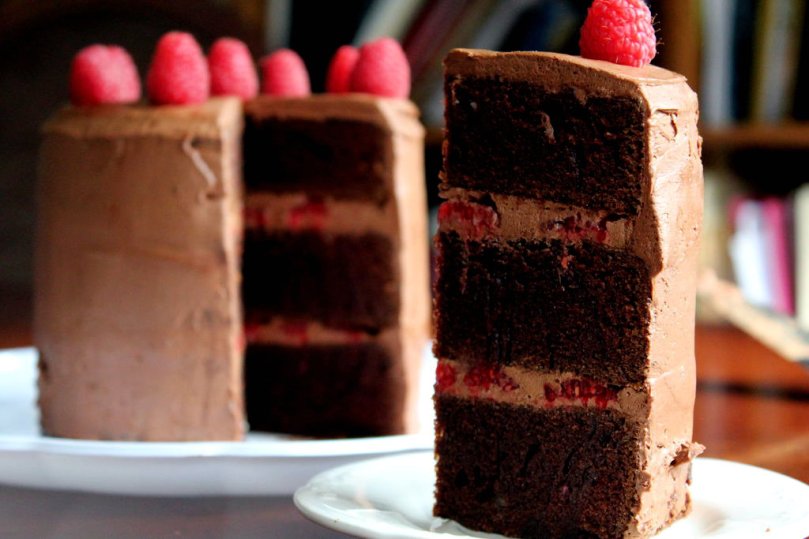
This chocolate cake I developed from different cake recipes on the internet, but I also add fresh raspberries inside the layers with chocolate ganache frosting. Dark brewed coffee added to the mix makes the cake more rich and moist.
5. HOMEMADE CINNAMON BREAD by Pioneer Woman
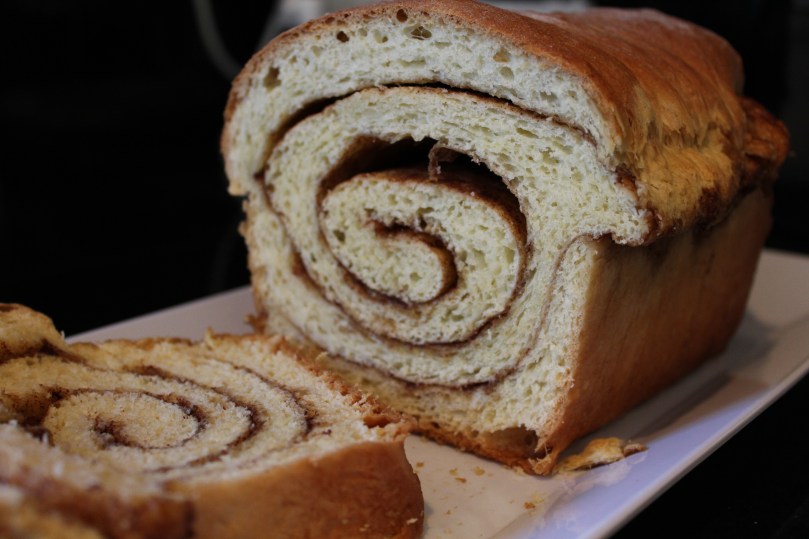
This cinnamon swirl loaf from Pioneer Woman is basically like taking cinnamon rolls and putting them in a loaf pan. I actually made a recipe inspired this one, but as I have not posted it it yet, I recommend this one for a twist on the good old cinnamon roll. Optionally, you can toast these swirled pieces of bread, and spread over with butter.
6. CHOCOLATE CHIP COOKIES from Michael’s Test Kitchen

These chocolate chip cookies on my blog are soft and delicious. Plus, the recipe provides healthier partial substitutes to sugar and some flour.
7. CREAM SCONES by America’s Test Kitchen

I’ve really liked almost all the America’s Test Kitchen recipes I’ve made, and this is one of them. It is a simple base for scones, and leaves you the opportunity to add in chocolate chips, or any kind of fruit pieces, such as dried blueberries.
That’s it for now; I hope that gave you some ideas.
Have fun baking!
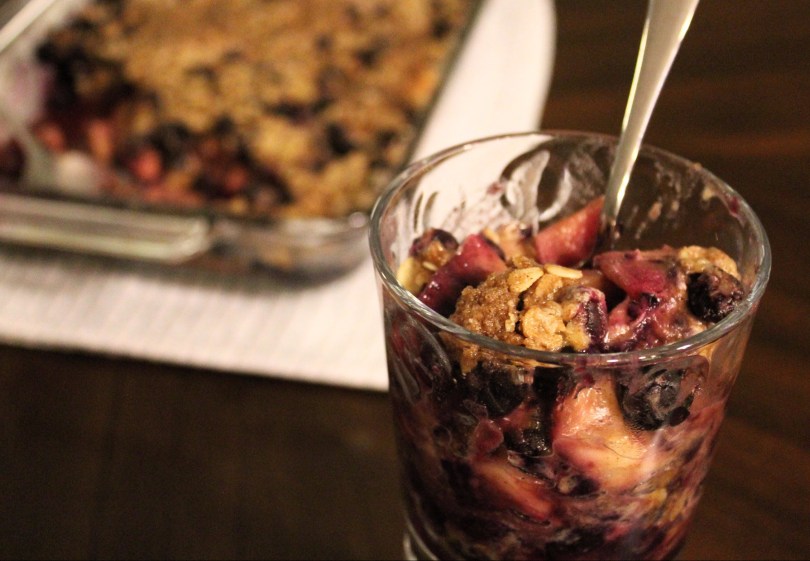
Blueberries added with apples make a great twist on the classic apple crisp.
If you want the recipe to make more, then increase the amount of apples and blueberries, and put it in a 9×13 dish instead of the smaller pan.
Ingredients:
Topping
⅔ cups flour
½ cup oats
⅔ cup brown sugar
¾ teaspoons baking powder
½ teaspoon cinnamon
¼ teaspoon salt
½ cup cold unsalted butter
Filling
4 apples
3 cups blueberries
1 teaspoon cinnamon
⅛ teaspoon nutmeg
¼ cup flour
¼ cup brown sugar
1 tablespoon lemon juice
3 tablespoons melted butter
¼ teaspoon salt
¼ teaspoon vanilla
2 tablespoons milk
DIRECTIONS:
Mix together flour, oats, brown sugar, baking powder, cinnamon, and salt in a food processor, or bowl. Add in chunks of cold butter and process or manually cut in the butter until it is small crumbs. Set in fridge until needed.
For filling, core, cut, and peel apples, and put them a large bowl. Preheat oven to 375 degrees.
Stir flour, cinnamon, nutmeg, melted butter, lemon juice, sugars, milk, salt, and vanilla in a small bowl until combined. Pour mixture over apples, and toss to coat completely.
Place apple mixture in an 8×12 pan, and sprinkle all of the crumb topping over it, evenly, until completely covered.
Bake in preheated oven for 35 – 40 minutes until mixture is bubbling, and topping is brown.
If you are serving this recipe to more than 6 people, then add 3 more apples to the mixture, and increase the amount of blueberries, and then put the mixture into a 9×13 pan. Bake longer than usual.


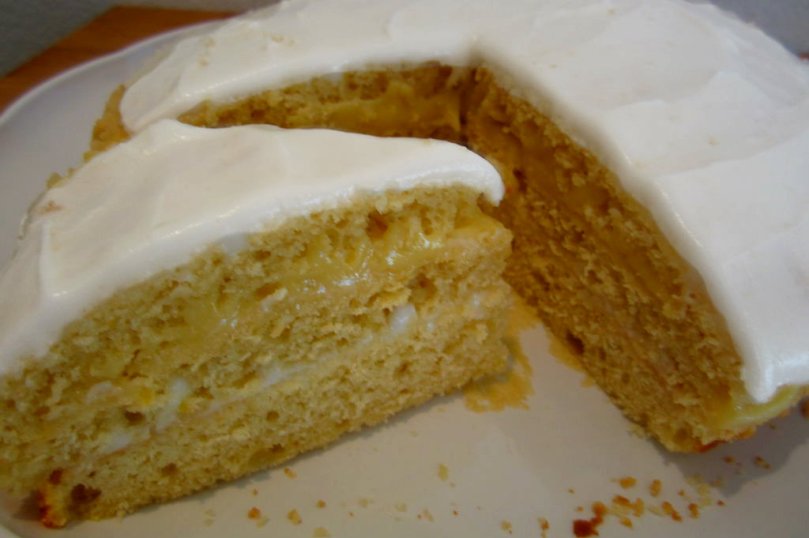
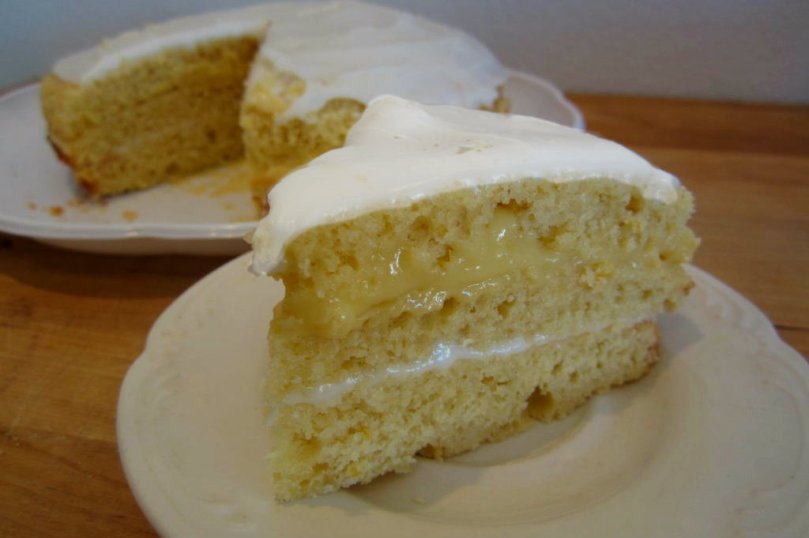
This layered lemon cake is comprised of three layers: Icing, Lemon Curd, then Icing, on three slices of cake.
INGREDIENTS:
(Makes one medium size cake, 16 medium slices)
CAKE:
ICING:
FILLING:
You can make your own lemon curd, or buy it from the store.
DIRECTIONS:
Grease two cake pans, and preheat oven to 350 degrees.
Cut the zest off a 1 lemon. Put it, and the sugar into a food processor, and blend for one minute, until all the zest is finely blended up. Transfer mixture to kitchen aid, or a plain ole stand mixer, and cream in butter. Add eggs one at a time, and then add vanilla.
In a separate medium bowl, combine flour, baking powder, and salt. Mix into wet ingredients until combined.
Pour batter into the two prepared cake pans, making sure one is thicker (the one you’ll cut lengthwise in half) than the other. Bake for about 25 minutes, or until cake springs back up to touch.
To make icing, whip melted butter, powdered sugar, milk and 1 Tbs. of lemon juice in a smallish bowl. Set to the side.
When they are done baking a cooled off, place the thinner cake section upside down on serving platter. Take the thicker one, and cut lengthwise in half. You’ll have two perfect thin section of cake for an extra layer.
On top of the first section that you placed on the serving platter, spread on half of the icing evenly.
Place one section of the thicker halves on top of this iced layer. Then spread on the lemon curd thickly. Place on the last layer of cake. On this one, spread the final layer of icing. Now you’re ready to serve it. If you prefer, you can always refrigerate a few hours before serving, and it might hold up a little better…
See my original post of this recipe on instructables

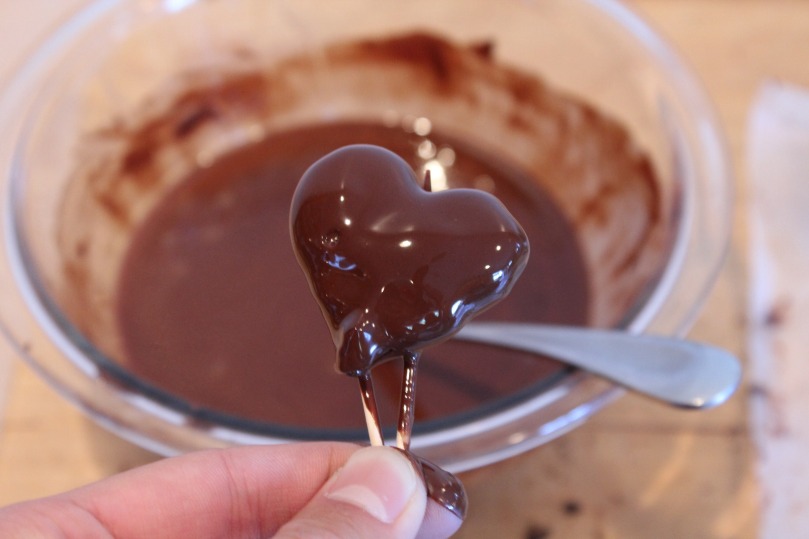
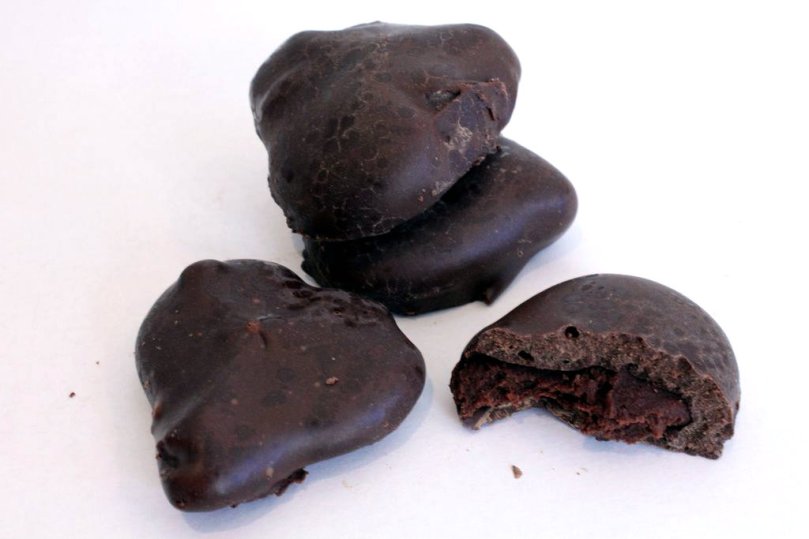
These raspberry heart chocolate truffles are the perfect candy/treat for Valentine’s Day. The outside is hard chocolate coating, and the inside is chewy soft raspberry chocolate. To complete that, they are shaped as hearts; but you can shape it any way you want.
Middle:
1/2 cup heavy cream
1/4 cup raspberry jam
1 1/2 cup chocolate chips
Coating; (if you don’t want to buy it)
DIRECTIONS:
In a small saucepan, heat the heavy cream and the butter until butter is melted and cream is at a slight simmer. Go directly to next step:
Pour the hot cream over the chocolate in a small bowl. (feel free to do variations on different kinds of chocolate; like milk chocolate, or whatever, as long as it is slightly sweetened). Let sit for a second, and then stir until completely smooth and melted.
Mix in the 1/4 cup of raspberry jam. You can also blend it with an immersion blender to make it smooth. Cool in fridge for half an hour or so.
This process will determine the shape of your truffles. And you can be creative here. I used a cookie press (i won from instructables) to press out the refrigerated chocolate cream on parchment paper.
This is purely optional; you can also roll the mixture out and cut out little hearts (no more than 1 inch wide) with little tiny heart cookie cutters when it is hardened. Or, you choose a different way. Ideally, you’ll have uniform little hearts (maybe even smaller than mine) that are easy to dip in the melted candy coating.
after shaping, place in freezer for half an hour before coating in next step:
Once perfectly hardened (in freezer is the fastest way), dip your chocolate centers into your melted chocolate candy coating.
1. First melt the chocolate candy coating in microwave, in a deep bowl. For easy dipping you should have about two cups worth of the candy coating.
2. I used two little toothpicks, and put them underneath the chocolate centers to hold them as they are dipped in chocolate. All you want to do is dip it straight in so that it gets completely covered in chocolate, and then take it straight out. Carefully place on parchment paper.
3. Store in an airtight container once hardened, preferably at room temperature.