Fruit Thumbprint Cookies

These Fruit-filled Thumbprint Cookies are quick & easy to make, and don’t require very many ingredients. The cookies are simplistic, consisting only of flour, butter, sugar, and vanilla. But put them together with fruit jam, and you add a whole other level of taste.

Serve with tea or enjoy anytime!

IMG_2934

IMG_2941


Fruit Thumbprint Cookies Recipe  — — — PRINT

Fruit Thumbprint Cookies recipe card picture


IMG_2940

Chocolate Raspberry Valentine Truffles

These raspberry heart chocolate truffles are the perfect candy/treat for Valentine’s Day. The outside is hard chocolate coating, and the inside is chewy soft raspberry chocolate. To complete that, they are shaped as hearts; but you can shape it any way you want.

 chocolate-truffles-main
INGREDIENTS:

Middle:

1/2 cup heavy cream

1/4 cup raspberry jam

1 1/2 cup chocolate chips


Coating; (if you don’t want to buy it)

Coating recipe


DIRECTIONS:

In a small saucepan, heat the heavy cream and the butter until butter is melted and cream is at a slight simmer. Go directly to next step:

Pour the hot cream over the chocolate in a small bowl. (feel free to do variations on different kinds of chocolate; like milk chocolate, or whatever, as long as it is slightly sweetened). Let sit for a second, and then stir until completely smooth and melted.

Mix in the 1/4 cup of raspberry jam. You can also blend it with an immersion blender to make it smooth. Cool in fridge for half an hour or so.

This process will determine the shape of your truffles. And you can be creative here. I used a cookie press (i won from instructables) to press out the refrigerated chocolate cream on parchment paper.

This is purely optional; you can also roll the mixture out and cut out little hearts (no more than 1 inch wide) with little tiny heart cookie cutters when it is hardened. Or, you choose a different way. Ideally, you’ll have uniform little hearts (maybe even smaller than mine) that are easy to dip in the melted candy coating.

after shaping, place in freezer for half an hour before coating in next step:

Once perfectly hardened (in freezer is the fastest way), dip your chocolate centers into your melted chocolate candy coating.

1. First melt the chocolate candy coating in microwave, in a deep bowl. For easy dipping you should have about two cups worth of the candy coating.

2. I used two little toothpicks, and put them underneath the chocolate centers to hold them as they are dipped in chocolate. All you want to do is dip it straight in so that it gets completely covered in chocolate, and then take it straight out. Carefully place on parchment paper.

3. Store in an airtight container once hardened, preferably at room temperature.

See my original post of this recipe on instructables.

chocolate-truffles-prep

Chocolate Raspberry Cake

This rich chocolate raspberry cake is a great delicious cake for special occasions. The raspberry mixes perfectly with the chocolate. Raspberry jam mixture fills the middle of this cake, with not-too-rich, but delicious chocolate cake layering it, with chocolate raspberry frosting on the top.

chocolate-raspberry-cake-main

Ingredients: (makes two nine-inch cakes for stacking)

BATTER:

1 ¾ cups all-purpose flour

½ cup chocolate chips

¼ cup cocoa powder

½ cup coffee, hot

1 ¾ cup sugar

1 teaspoon salt

2 teaspoons vanilla extract

1 ¾ teaspoons baking soda

4 large eggs + 2 egg yolks

½ cup oil

1 cup buttermilk

¼ cup butter, softened


FILLING: (Not shown in pictures)

1/2 cup frozen raspberries

1/4 cup raspberry jam


FROSTING:

1 cup chocolate chips (8 oz)

⅔ cup heavy cream

4 tablespoons butter

1 teaspoon vanilla extract

¼ cup sugar

1 teaspoon corn syrup

1 cup frozen raspberries


DIRECTIONS:

Grease and flour two 9 inch cake pans, and line with parchment paper. Preheat oven to 350 degrees.

In a saucepan full of water over medium heat, in an empty medium heat-proof bowl, pour hot coffee. Pour in the baking chocolate and cocoa powder and stir until chocolate is melted. Pour in sugar, and stir until it is dissolved. Mix oil in well. Remove from heat and set aside.

NOTE: this contraption (the saucepan with water in it, on medium heat, with a medium bowl on-top of the water) is essentially almost like a double boiler in the way that it works.

In a medium bowl, combine flour, baking soda, and salt. Set aside for later.

Prepare buttermilk for pouring. If you don’t have buttermilk, just use an easy substitute: In a measuring glass as shown, pour in one tablespoon of vinegar, and then fill the rest up with milk until it reads as 1 cups worth. Set aside.

This process is called ‘ribboning’ and is a way to make cakes light and fluffy in texture. Put in eggs and egg yolks into stand mixer, if you have one, and beat for a few seconds, until mixed up. Add sugar, and whip on high for a couple minutes, until the mixture is doubled in size, and light and fluffy.

Go straight on to the next step from here.

Now is the time to add everything you’ve prepared: Add the chocolate mixture and softened butter to the sugar egg mixture, and mix until combined. Do not whip. just stir slowly into it.

Then add flour and butter mixture alternately, first flour, then buttermilk, then flour, etc., ultimately starting and ending with the flour. Scrape the sides and keep mixing for a few more seconds, until just combined. Do not overmix.

Pour in equal amounts into the prepared cake pans. Bake in preheated oven (350 degrees) for at least 25 minutes, continually checking at and after the time said.

The cakes are done when a toothpick inserted directly in the middle comes out with only a few moist crumbs.

When cakes are done, turn them upside down on a cooling rack, taking off pan, and then flipping the cakes right-side up again. Let them sit this way to cool for around two hours before attempting to put the frosting on.

Place frozen raspberries in a microwave safe bowl, and heat in ten second intervals, mashing well in between until raspberries are just like puree (as shown in pic).

Mix these crushed raspberries with the raspberry jam, and set aside.

To make the raspberry juice, which will go in frosting:

using the same process described in the last step, mash frozen raspberries in between ten second intervals in microwave, until it is just juicy mash. Strain using cheesecloth or a sieve (cheesecloth is better) into a bowl to obtain the raspberry juice (bottom pic).

This process is very similar to making ganache, just a bit different, with a bit different ingredients.

Melt heavy cream and butter in saucepan, and bring to a boil. Reduce heat to low, and stir in sugar and corn syrup until sugar is dissolved.

Chocolate chips should be in a medium, deep heatproof bowl. Pour this hot heavy cream mixture over the chocolate chips, and stir until chocolate chips are melted.

Stir in the raspberry juice, and then place bowl into an ice bath, as shown above. Stir constantly until frosting is cold, and starts hardening to the sides.

Take out of ice bath, and whip with a beater until frosting is light and fluffy.

Go onto the next instructions immediately before it melts:

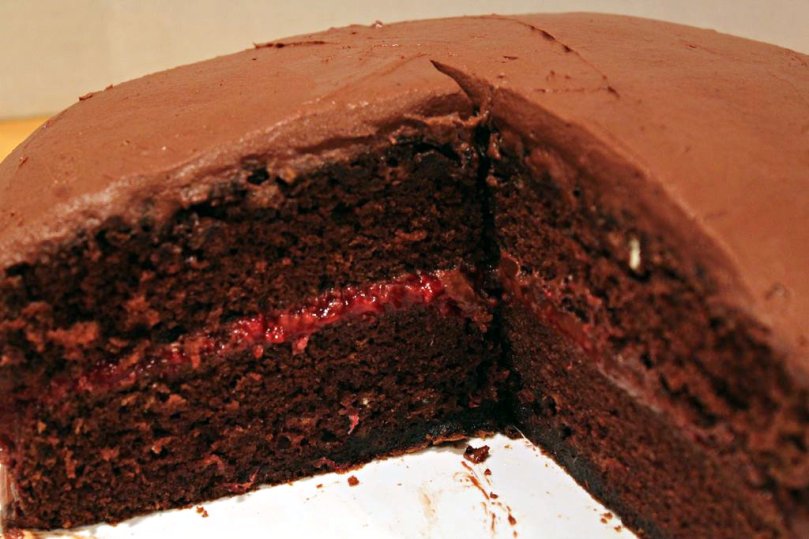
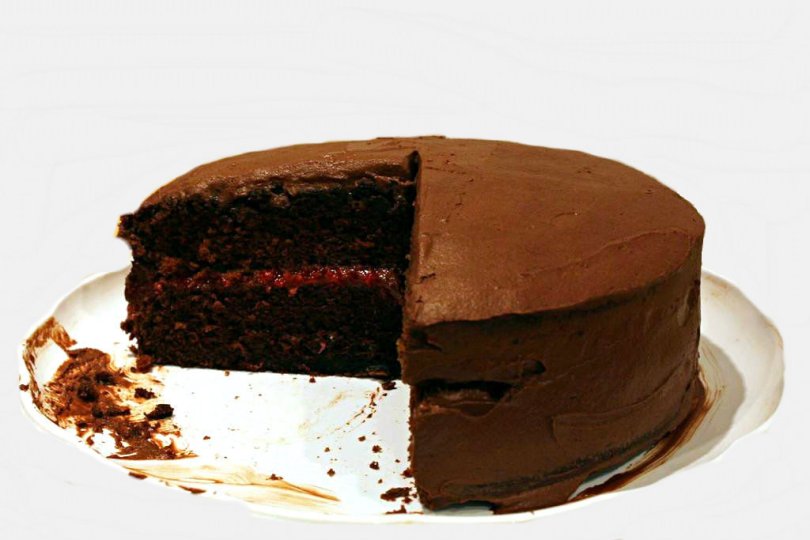
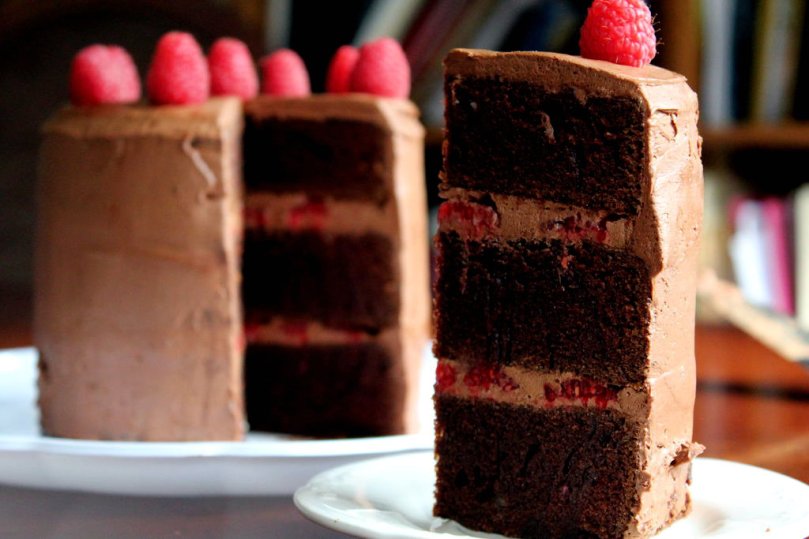
Start with the first layer of cake. Spread all of the raspberry jam mixture onto this layer. Then carefully put some of the frosting on top of this. Place the second layer on top of it. Then ice the rest of the cake, sides, and top completely with all the remaining chocolate-raspberry frosting.

A cake frosting knife as shown in pic is very helpful in this situation.

Refridgerate 20 minutes before serving

Store in fridge, completely plastic wrapped to keep it from drying out.

Here’s the link to my original post of this recipe on instructables.

chocolate raspberry cake main #2.jpg

Chocolate Cake with Ganache Frosting

Finally, JUST a chocolate cake. A rich, plain old chocolate cake, using many of the same ingredients and techniques that are used in my instructables Raspberry Chocolate Cake and Harry Potter’s Birthday Cake

chocolate-cake-main

I learned a lot from Jen Wold’s Cake Decorating Class on Instructables, and really recommend it to any beginner cake makers (like me) who like to make cake, and want to learn how.

Ingredients:

(For Cake Batter, Makes three 6-inch round cakes)

1 ¾ cups all-purpose flour

½ cup chocolate chips

¼ cup cocoa powder

½ cup coffee, hot

1 ¾ cup sugar

1 teaspoon salt

2 teaspoons vanilla extract

1 ¾ teaspoons baking soda

4 large eggs + 2 egg yolks

½ cup oil

1 cup buttermilk

¼ cup butter, softened


(For Frosting)

1 ⅓ cup chocolate chips (a bit more than 8 oz of baking chocolate)

⅔ cup heavy cream

4 tablespoons butter

1 teaspoon vanilla extract

¼ cup sugar

1 teaspoon corn syrup


DIRECTIONS:

Butter and flour three 6-inch cake pans, and preheat oven to 350 degrees.

If you only have two 6-inch cake pans, don’t worry. You can bake two cakes, then take them out, and use the same one to bake in again, with the reserved batter.

Over a saucepan filled a bit with simmering water, in a medium bowl, pour the hot coffee. Stir in chocolate chips and cocoa powder, and stir until chocolate is melted. Stir ½ cup of sugar until it is creamy and dissolved, a couple minutes. Mix oil in well. Remove from heat and set aside.

In a medium bowl, combine flour, salt, and baking soda.

To substitute buttermilk, if you don’t have it: in a measuring cup, add 1 tablespoon of vinegar. Fill the rest of the cup up with milk and let sit for a few minutes. Combine this, or buttermilk, in a medium bowl with vanilla.

In a stand mixer, whip all the eggs, and the remaining 1 ¼ cup of sugar on high for a few minutes, until fluffy and light. Stir in the chocolate mixture and softened butter until completely combined.

Add a bit of the flour mixture, and a bit of the buttermilk mixture alternately into the sugar mixture in the stand mixture, starting and ending with the flour mixture. Stir until combined, no more, no less.

Pour the batter in equal shares into the prepared cake pans, (if you only have two 6-inch pans, then pour 2/3 of the batter into the two of them, and reserve the other third for when the next pan is out of the oven).

Bake in preheated oven for at least 25 minutes, checking to see if done after 25 minute period. Doneness is reached when toothpick inserted in the middle comes out with only a few crumbs.

If you only had two 6-inch cake pans, now’s the time to bake that other cake real quick, and you’re done with the cakes!

When done, flip cakes over, still in their pans onto cooling rack, peel off the parchment paper. Then flip right side up on the racks and let cool completely before frosting, a couple hours. Then with a large serrated knife, level the tops of the cakes off, so you have a nice even surface, and a nice even cake, and not the Leaning Tower of Pisa.

Heat heavy cream and butter in saucepan on medium heat until it just begins to boil. Make sure butter is melted. Return heat to low, and stir in corn syrup, and sugar, until sugar is dissolved. Add vanilla.

Pour hot mixture over chocolate chips in a medium metal bowl, and stir until chocolate is melted. Place chocolate mixture in bowl in a ice bath, and stir until frosting hardens a bit. Take out of ice bath and whip with a beater until it is light and fluffy.

Now’s the time to ‘decorate’ the cake, or just frost it. As I mentioned before, there is a great class on Instructables making a great cake, particularly the decorating. See that class here.

It was a really helpful class, and here’s my own instructions on how to ice the cake:

If you haven’t yet, level the rounded tops of the cake layers so that they are flat, with a knife.

Start with the first layer of cake.

Put some of the frosting on top of the center. With your knife angled outwards, turn the cake platter, and push the frosting gradually out, until there is a smooth circle of frosting on the top of the cake.

If you want to, as I did, you can smash some fruit like strawberries, or raspberries in between layers, as in picture.

Place the second layer on top of it. Repeat the process as described above.

Then put on the last layer of cake. Then ice the rest of the cake, sides, and top, making sure to reserve a good bit of icing for going over the cake again. The first layer you just put on is the ‘crumb’ layer, and after cooling it in the fridge for 20 minutes or so, you should have a nice solid cake to put the last layer of ganache on.

A cake frosting knife as shown in pic is very helpful in this situation. After applying the final layer of ganache, refrigerate for another 20 + minutes, and then take out of fridge.

Now, if you want to, you can do something extra that will probably make your cake look smoother and nicer.

Run your cake knife over really really hot water for about fifteen seconds, then quickly dry it with a paper towel, and run the hot knife smoothly over the cold ganache. Repeat this a few times until you have a smooth frosting.

Store in fridge, completely plastic wrapped to keep it from drying out.

Serve.

To see full step-by-step pictures for this recipe, go to my original post on instructables.

chocolate-cake-main-2

Raspberry Scones with Almond Glaze

Raspberry Scones are not only a perfect treat for summer, but all year round. The raspberries should not be fresh, but rather frozen. Finish them off with a bit of complimentary Almond Glaze.

raspberry-scones-main


Ingredients: (makes 8 scones)

2 ½ cup flour

1 teaspoon baking soda

½ teaspoon salt

2 teaspoons cream of tartar

3 tablespoons sugar

1 cup buttermilk

¼ teaspoon almond extract

12 tablespoons unsalted butter, frozen

¾ cup frozen raspberries


For Glaze:

¾ cup powdered sugar

3 tablespoons milk

¼ teaspoon almond extract

1 tablespoon butter, melted


DIRECTIONS:

Preheat oven to 375 degrees. (If using convection, preheat At 350).

In a large bowl, quickly whisk together the flour, cream of tartar, salt, baking soda, and sugar.

In a small bowl, mix together the buttermilk, and almond extract.

With a food processor on the ‘shred’ setting (like for shredding carrots and other vegetables), shred the frozen butter.

Cut these shreds into the flour mixture in the large bowl.

Fold the sour cream mixture into the flour mixture until just combined. If it is too dry, then add 1 -2 tablespoons of milk until moist. Be careful to mix just until combined. Do not over work the dough.

Then dump in the raspberries, and fold those in carefully. Don’t worry if the raspberries break up too much, they’ll still be fine.

Turn the resulting dough onto a piece of parchment/wax paper. Carefully shape dough into an 8-inch circle, ¾ inch thick. Be careful not to overwork the dough.

Cut out 8 pieces like you would a pie.

Place these 8 pieces onto a baking sheet, brush the tops over with some milk, and bake in preheated oven for about 15 minutes or longer, until the scones are golden.

Meanwhile, be making the almond glaze, by beating all the glaze ingredients together (powdered sugar, milk, melted butter, and almond extract).

If the consistency is too thick, add a tiny bit more milk. If it is too runny, add more powdered sugar.

Drizzle over baked scones.

Serve warm.


See my original post on raspberry scones on instructables.

raspberry-scones-dough-ingredientsalmond-glaze-ingredients

shredded-frozen-butter
Shred Frozen butter…
roll-out-rasberry-scones
…shape into a ball