Make Ahead Custom Salad Bar

This post will be showing you how to prepare a gourmet salad ahead of time. This is extremely helpful if you have other things to do on the day you make the salad, and don’t want to have to worry about cutting all the vegetables and other little necessities. In this solution, you will be cutting everything up the day before you plan to serve/eat the salad.

make-ahead-salad-main

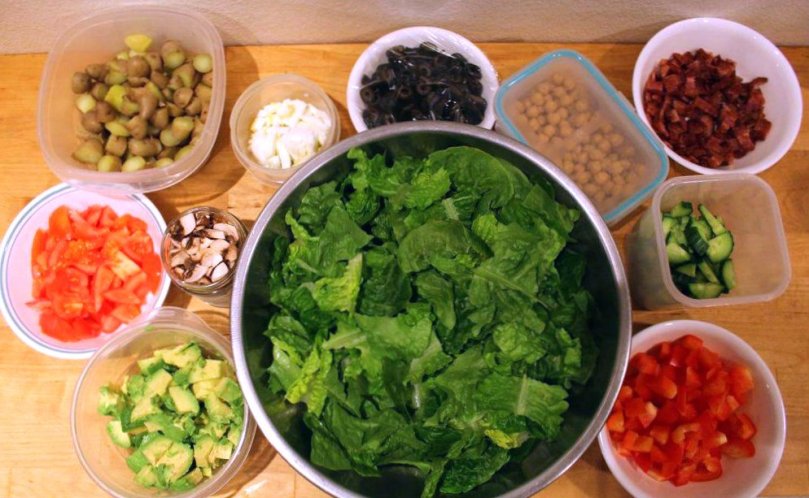
Another benefit with cutting all the stuff up and putting them in separate containers is that you can let your family pick and choose, and essentially create their own custom salad.

If you don’t like the idea of cutting it up the day before, you can do it on the same day, but it is a good idea to make ahead of time the eggs, potatoes, and bacon.


INGREDIENTS:

6 eggs

2 Cups mini potatoes
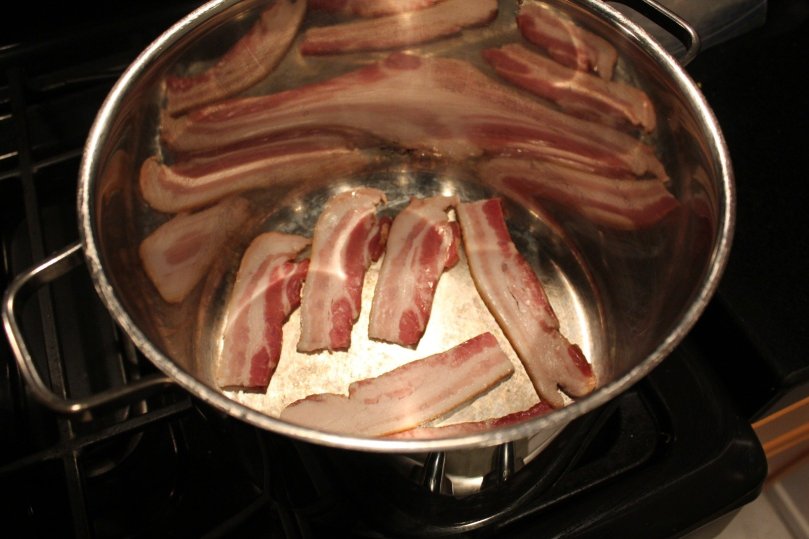
4 pieces of bacon

3 medium tomatoes

2 bunches of romaine lettuce

2 cups mushrooms

1 cup garbanzo beans

1 bell pepper

1/2 a large cucumber

1-2 cups cheddar cheese

Your favorite vinaigrette or ranch dressing


ingredient note:

Mini potatoes are the easier, quicker way to go, but if you want to stick to regular potatoes, they will boil for longer, and you will have to dice each one into small salad-size pieces–which will take longer, but it certainly is another way to go.


DIRECTIONS:

To prepare eggs and potatoes, in two separate saucepans, one large, and one medium, put in water about ⅔ up the sides of the saucepans. Bring water to an almost boiling state in both. In the large saucepan, carefully place in all the eggs, and set the timer to 20 minutes. In the other saucepan, dump in the potatoes, and set timer to 20 minutes (or just the same time for both) or until potatoes are very soft. When done, take potatoes and eggs out of pan, discarding the water.

Once cool to touch, cut the potatoes in small bite size pieces, and peel eggs. Cut eggs once peeled into thin slices using a wire egg cutter, if you have one. Store potato pieces and egg pieces in two separate sealed plastic containers in fridge until chilled, and ready to use for salad.

To prepare bacon, heat a skillet over medium heat, and put the four pieces of bacon on. Sizzle on both sides until both sides are perfectly dark brown. Place bacon pieces on a paper towel, and press to remove extra grease. Cut bacon, once cool, into small pieces, as shown.

Store in a plastic container in fridge until ready to use.

Cut tomatoes in half inch chunks with a serrated knife, after washing, and also wash lettuce thoroughly, tear into small salad-size pieces, and place in a leaf-dryer, and turn fast until most of the water is wrung out.

Store tomatoes and lettuce in their own separate sealed containers in the fridge (don’t squish the lettuce), at least, if you are cutting these the day before you make the actual salad.

Wash mushrooms if they haven’t already been pre-washed, and cut lengthwise in thin strips.

Strain the garbanzo beans in a colander. and put in a plastic container in fridge until ready to use. Also put the mushrooms in their own container and place in fridge.

Wash half the cucumber. Chop cucumber width-wise as shown into circles. Cut these circles into quarters, and place in container in fridge until ready to use. Shred cheese using the shred attachment on your food processor, or do it by hand. Also store the cheese in a plastic container in fridge until ready to use.

Chop bell-peppers into small pieces as shown. Store in plastic container in fridge.

And you’re done!…almost. Remember to prepare your favorite ranch dressing or vinaigrette. You can buy them or make them. Here’s a good vinaigrette recipe to use: Balsamic Vinaigrette.

Just before you are ready serve your salad (i.e. before your guest arrive :), Take out all the containers you used to store your stuff in, and lay them out on the serving table, to give everyone an option of what exactly they want in their salad. Or, if you want to, you can just throw it all together in a large bowl before serving, it’s your choice.

See pictures below. See my original post on instructables.

eggs-boiling
Preparing the eggs…
potatoes-boiling
Preparing the Potatoes…
bacon-frying
…frying the bacon.


Cheese-Stuffed Gourmet Hamburgers

Cheese-Stuffed Gourmet Hamburgers: Cheese-filled patties are smashed into a hot buttered grill to cook. Caramelized onions are mixed into the ground beef before cooking. A special hamburger sauce is smeared on both hamburger buns, and the meat is seasoned with a mixture of steak seasoning and seasoned salt.

And the nice thing about burgers is that they are easy to customize.

cheese-filled-burgers-main

SEE RECIPE BELOW:

cheese-burgers-ingredients

INGREDIENTS:

(makes 8 burgers)

2 lbs. ground beef

1 egg

1 onion, minced

Cheddar cheese

2 large tomatoes

8 leaves of Romaine lettuce

2 large Pickles

8 pairs Hamburger buns

For sauce:

½ cup mayonnaise

⅛ cup mustard

1 tablespoon sweet relish

1 teaspoon lemon juice

For Seasoning:

3 teaspoons Montreal Steak Seasoning

1 teaspoon Seasoned Salt

Additional Things:

Ketchup

Mustard

Butter for Griddle

NOTE: For higher quality beef (and for health reasons) get grass fed beef. Chances are you’ll be able to taste a difference between good quality and poor quality meat.

If you prefer to remove the egg from the meat, it will not hold together as well, but it’s still and option.

DIRECTIONS:

Mince the onion into tiny little chunks, as shown. Over a nonstick pan (or otherwise) on medium heat some vegetable oil. Once oil is hot, dump the onions in a fry, stirring occasionally, until they a browned well, as shown, about 5-10 minutes. Remove from heat.

Making sure to drain excess juices from the beef’s container, dump the 2lbs of meat in a large bowl, and break it up with your hands. Break an egg into the bowl, and mix it in completely with your hands.

Next, add the recently ‘caramelized’ onions, and stir well into the meat.

Break the meat up evenly into 16 small balls, and situate the first 8 on wax paper. Flatten each 8 of the balls into a thin, medium-large patties. On half of the patties, place a chunk of cheese, not to thick, and be sure that the cheese is at least half an inch from the edges of the patty.

Now fold the empty half of the patties over the cheese-filled ones, and press firmly around the edges and everywhere until perfectly sealed. Take these finished patties using the wax paper, and place them onto a cookie sheet. Do the cheese-process with the remaining 8 patties, using a fresh layer of waxed paper. Once done, place these finished patties next to the other ones on the same cookie sheet, as shown. The cookie sheet is for easy transportation to grill.

Place the sweet relish, lemon juice, mayonnaise, and mustard in a small bowl, and stir well.

Stir the Montreal steak seasoning and seasoned salt in a smaller bowl.

NOTE:

The sauce and the seasoning are very similar to a copycat of Smashburger’s burgers that I found.

You should now cut up the tomatoes, pickles, lettuce, and whatever else you want on you hamburgers. Preheat the grill on medium-high heat, and put a cast iron flat griddle on top of it. Or, alternatively, a flat griddle on your stove top.

Bring you seasoning mixture, and your patties out to your preheated grill (or on your stove top, if you prefer). Melt the butter on the flat griddle. Place four of the patties on the butter. Cover with the wax paper they were on, and smash with a burger-smasher, or with a plate, or whatever else that works. Remove wax paper.

Sprinkle a generous share of the seasoning on each patty. Close the grill, and let it cook for about three minutes.

Open the grill after three minutes, and check to see if the burgers are done on the other side. It should be cooked around the edges, at least. If so, flip the burgers, and sprinkle again on the other side with the seasoning. Close grill, and let it grill for another 3 minutes. When burgers are done, transfer to a plate, and cover with aluminium foil, to keep hot while you grill the other batch of patties.

Do the same thing with the next four patties that you did with the first four. Transfer to plate, and cover with foil until ready to piece together the burgers:

  1. Place the bottom bun on the plate.
  2. spread a generous helping of the sauce on this bun.
  3.  Place a lettuce leaf on it.
  4.  Put on one of the patties, and then tomatoes
  5. Add pickles.
  6. Spread sauce on the bottom of the top bun, and smash it down on the rest of the burger.

EAT WHILE HOT.

See more pictures below. See my original recipe post on instructables.

cheese-in-patties
Put the cheese in the middle…
on-the-grill
Set up your grill…
grilling-the-patties
Grill the patties…
eaten-burger
…Eat it hot.


Healthy Fruit and Nut Snack Balls

These healthy fruit and nut snack balls make a perfect snack anytime.

They are essentially dates, cranberries, cherries, almonds, and walnuts, and deliver the nutrition of the fruit and the protein and fiber of the nuts.

They are also very easy and simple to make.

fruit-nut-snack-balls-main

Ingredients (makes approx. 24 balls):

40 medjool dates

¼ cup cranberries

¼ cup cherries

¾ cup almonds

½ cup walnuts

½ teaspoon cinnamon

½ teaspoon salt

Optional, but recommended:

½ cup mini chocolate chips


DIRECTIONS:

Place dates, cranberries, and cherries in a food steamer.

Steam for about 10 minutes.

Place steamed fruits in a food processor, and blend them until creamed. Add cinnamon and salt and blend a bit more.

Place almonds and walnuts in a blender, and pulse until nuts are in very small little chunks, as shown.

Dump both the nuts and fruits into a large bowl, and mix and stir until completely incorporated.

If using chocolate chips:

Let fruit/nut mixture cool in fridge before attempting to stir in chocolate chips.

If you are using chocolate chips, now’s the time to mix those into the fruit mixture.

Roll mixture into little 1-inch balls with your hands, and place all on a parchment/wax-paper lined tray.

Place in fridge for 10+ minutes before using.

mixed-snack-balls
Mix it all together…

snack-ball-on-hand

Healthy Lemon Poppy-seed Muffins

These Lemon Poppy-seed muffins are made healthy by using coconut oil instead of butter, coconut sugar instead of cane sugar, and some gluten free flour replacing some of the all-purpose flour. These make a great snack anytime of the day.

lemon-poppy-muffins-main

Ingredients: (makes 12 muffins)

½ cup softened coconut oil

½ cup coconut sugar

2 eggs, separated

½ cup + ⅓ cup all purpose flour

½ cup all-purpose gluten-free flour

1 teaspoon baking powder

½ teaspoon baking soda

1/4 teaspoon salt

2 tablespoons poppy-seeds

2 tablespoons lemon zest

3 tablespoons lemon juice

½ cup buttermilk (to easily make your own buttermilk, see step #_)

1 teaspoon vanilla


DIRECTIONS:

Preheat oven to 350 degrees. Grease muffin tins, or place little muffin papers in each.

(Optional but preferred: Put the lemon zest and sugar into a food processor and blend until zest is all blended in with the sugar. This is good to impart a more lemony flavor. )

In a large bowl, cream coconut oil and coconut sugar. Add eggs one at a time, until creamy and combined.

Place the egg whites separately in a medium deep bowl.

If you don’t have buttermilk, then you can easily make this substitute, that works just as well:

You’ll need 1/2 cup of buttermilk, so in a liquid measuring glass, pour in 1/2 tablespoon of vinegar. Then pour in the milk till it is filled up to 1/2 cup. Let sit for a few minutes, until curdled.

In a separate medium bowl, mix the flours, baking powder, baking soda, salt, poppy-seeds, and lemon zest. (if you already blended the lemon zest in with the sugar like I earlier suggested, then obviously, you won’t be putting it into this bowl)

Dump the flour into the sugar/oil mixture. Alternate this with pouring in the buttermilk, and lemon juice, and then vanilla, until everything is combined.

With a high-speed handmixer, whip the egg white until tall peaks form, and it is light and fluffy.

Carefully fold in the egg white into the batter until completely incorporated. Spoon evenly into the 12 muffin tins.

Bake in oven for about 25 minutes, or until golden brown.

See some step-by-step pictures below, or go to my original instructable recipe.

lemon-poppy-muffins-main-2


egg-white-beat
Beat the egg white…
lemon-poppy-muffin-batter
Mix it all together…

Hot Artichoke & Spinach Dip

This dip is very quick and easy to make. It is good for parties and holidays like Thanksgiving, Easter, and Christmas.

artichoke-dip-main


INGREDIENTS:

4 oz cream cheese, softened

4 oz goat cheese, softened

¼ cup mayonnaise

1/2 cup shredded Parmesan

¼ cup shredded mozzarella cheese

½ teaspoon garlic salt

Sprinkling of pepper

½ cup mix of spinach and kale

1 (14 oz) can artichoke hearts, drained


DIRECTIONS:

Preheat oven to 350 degrees.

Spray two small glass baking dishes with nonstick oil.

Mince the artichoke and spinach and kale. Set aside.

In a medium bowl, stir together cream cheese, goat cheese, mayonnaise, Parmesan, garlic salt, and pepper. Throw in the spinach, kale, and artichoke hearts, and stir in until combined.

Evenly spread mixture into both glass dishes.

Sprinkle the tops over with the mozzarella cheese.

Bake in preheated oven for about 25 minutes, or until browned, and bubbling.

Let cool for about 5-10 minutes before serving.

Serve warm.


RECIPE REVIEW: Pumpkin Bread from “Once Upon a Chef”

Instead of posting one of my own recipes, I decided to review a recipe from another food blog; so this post is a Recipe Review from the food website: ‘Once Upon a Chef’, with its recipe for Pumpkin Bread.

SUMMARY:

First, I made this pumpkin bread, and it was a very good pumpkin bread. I would recommend you make it. It is a quick, easy, and pleasing recipe for fall, and if you don’t want to used the canned pumpkin, just buy a sugar pumpkin, and see my instructions on how to make pumpkin puree.

pumpkin bread main #2.jpg

METHOD:

This pumpkin bread is as quick and easy to make as cookies. It starts with the sugar and butter; then the eggs, whipping until fluffy; then the pumpkin puree, then the dry ingredients. Then you simply pop it into the oven–the only thing being that it takes approximately 65 minutes to bake at the relatively low temperature of 325 degrees, insuring a burn-free soft bread.

Also, I really like that the recipe calls to butter and flour the bread pans (and I highly recommend it, too) because it makes the bread so much easier to come out of the pan. This goes especially for cakes, as well. It makes a lot of difference.

The pumpkin bread was very soft, with a great pumpkin flavor.

CHANGES:

The only thing I did differently was to reduce the amount of sugar (something I do with all my desserts, now). In my experience, even if you reduce the sugar by a third, you may never notice a difference at all. And, it is automatically much healthier for all that.

I used homemade pumpkin puree instead of canned pumpkin. Homemade pumpkin puree is good if you want it fresh and healthy, and canned pumpkin is good if you like saving yourself time in the kitchen.


So, overall,it was an awesome recipe, and I recommend it to anyone who likes baking and making seasonal treats; and anyone who is looking for a great pumpkin bread recipe, most of all.

Thanks for stopping by, and be sure to check out this Pumpkin Bread Recipe from Once Upon a Chef!


Homemade Pumpkin Puree

If you don’t want to use the store-bought canned pumpkin, then homemade pumpkin puree is the way to go. The only ingredient you’ll need: 1 sugar pumpkin, which equals approximately one 15 oz can of pumpkin puree.

The Sugar Pumpkin:

1-sugar-pumpkin

INGREDIENT:

1 sugar pumpkin


DIRECTIONS:

Preheat oven to 375 degrees. Cut off the stem, then cut the pumpkin in half, and scrape out all the seeds and strings, reserving them if you plan on roasting the seeds. Cut the halves again into half, so that you have four pieces of pumpkin.

Place all the quarters of the pumpkin face down on a baking sheet, cover with foil, and bake in preheated oven for about an hour and a half, until tender.

Scrape the tender meat off the rind, and place in a high speed blender, or food processor. I used a Vitamix, which works really well. Puree until completely smooth, and no chunks are found.

Now you’re ready to use this your next fall recipe! Pumpkin pie, pumpkin bread, pumpkin roll, pumpkin soup, etc….

Use 1 sugar pumpkin worth of puree PER 15oz can of pumpkin.


Quartered and scraped pumpkin

pumpkin quartered.jpg


Mini Hamburger Sliders

These mini sliders make a great side dish for parties/potlucks/dinners, etc.

mini-burgers-main

Ingredients: (makes 16 sliders)

2 lbs. Ground beef

16 mini slices cheddar cheese

16 small leaves romaine lettuce

16 small slices of tomato

1 egg

16 mini burger buns

For sauce:

½ cup mayonnaise

⅛ cup mustard

1 tablespoon sweet relish

1 teaspoon lemon juice

For Seasoning:

3 teaspoons Montreal Steak Seasoning

1 teaspoon Seasoned Salt

Additional Things:

Ketchup

Mustard

Butter for Griddle


DIRECTIONS:

Break up with ground beef in a large bowl. Dump in the egg, and mix it completely in to the beef with your hands.

Shape beef into 16 even balls, and then shape into little patties.

Prepare the slices of cheddar, lettuce, and tomato on a serving platter.

For the seasoning, in a small bowl combine steak seasoning and seasoned salt.

For sauce, stir mayonnaise, mustard, sweet relish, and lemon juice in a small bowl for the sauce.

Preheat the grill, and place a cast iron flat griddle over it. Or, you can preheat a flat surface over your stove for the burgers.

When ready to grill patties, take the patties, seasoning, and cheddar cheese out with you to the grill. Spread butter over the hot surface.

Then place down burgers, and press with a burger press, or a dinner plate. But if your patties are already flat enough, you don’t need to press them.

Sprinkle patties with the seasoning.

Let grill on this one side for a minute or so.

After the first side is cooked, flip patties, and sprinkle the cooked sides with more seasoning. Place a piece of cheese over each patty.

When done grilling, take patties off the grill, and on a plate. Cover with aluminum foil.

As you can only probably grill 8 at a time, when you take off the 8, then grill the next 8 patties.

To prepare sliders, place bottom burger bun down.

Spread a small amount of sauce over it.

Then lettuce, then patty with cheese.

Then place tomato on, then ketchup and mustard.

Finally, cap it with the top burger bun, and secure everything with a long party toothpick.

Do this process to the rest of the burgers.

Serve warm.


burger-mini-grill

Drunken Chicken: Easy White Wine Chicken

Drunken chicken is a perfect dinner to make if you have limited time to make dinner. It is easy to make, and very flavorful.

drunken-chicken-main

Cook time: 1:15 hrs.  Serves: 4

Ingredients:

1 (2lb) package drumsticks (or other dark meat chicken)

1/2 white onion

8 ounces of mushrooms (more or less depending on preference)

Salt, pepper

3 cloves garlic

3/4 cup white wine


DIRECTIONS:

Preheat oven to 375 degrees.

Roughly cut onion, and place on the bottom of a 9×13 baking dish.

Pour in pre cut mushrooms.

Mince garlic and set aside.

Rinse raw chicken in the sink, then place on top of onions and mushrooms in the baking dish.

Sprinkle minced garlic over chicken, and salt and pepper them.

Then pour white wine evenly over the chicken.

Cover with foil and bake in preheated oven for 1 hour, then raise temperature to 400, and take foil off, and cook for another 15 minutes, until chicken is brown.

Serve with white rice.

drunken-chicken-second-main

Harry Potter’s Birthday Cake AS SEEN IN THE MOVIE

I made this cake to match the one in the movie: the one Hagrid gave Harry Potter for his birthday, in the first Harry Potter movie: The Sorcerer’s Stone.

harrys-birthday-cake-main

See the original cake from the movie: http://lovelace-media.imgix.net/uploads/1022/41bca…

Inside is a rich chocolate cake with chocolate frosting filling.

The top frosting is a normal buttercream frosting, died pink, and written on with green decorative icing.

harrys-birthday-cake-second-main

INGREDIENTS:

For Batter:

1 ¾ cups all-purpose flour

½ cup chocolate chips

¼ cup cocoa powder

½ cup coffee, hot

1 ¾ cup sugar

1 teaspoon salt

2 teaspoons vanilla extract

1 ¾ teaspoons baking soda

4 large eggs + 2 egg yolks

½ cup oil

1 cup buttermilk

¼ cup butter, softened

For Middle Frosting:

½ cup chocolate chips = 4oz baking chocolate

½ cup heavy cream

1 tablespoons butter

½ teaspoon vanilla extract

⅛ cup sugar

1 teaspoon corn syrup


For Pink Top Frosting:

¼ cup butter, softened

3 cups powdered sugar

¼ cup milk

¼ teaspoon vanilla

Red food coloring

Green Decorative Icing

DIRECTIONS:
Butter two 9 inch cake pans, then coat with flour. Tap out any excess flour.

Over a saucepan filled a bit with water, in a medium bowl, pour the hot coffee. Stir in chocolate chips and cocoa powder, and stir until chocolate is melted.

Stir ½ cup of sugar until it is creamy and dissolved, a couple minutes. Mix oil in well. Remove from heat and set aside.

In a medium bowl, combine flour, salt, and baking soda.


(To substitute buttermilk, if you don’t have it: in a measuring cup, add 1 tablespoon of vinegar. Fill the rest of the cup up with milk and let sit for a few minutes.)

Combine buttermilk in a medium bowl with vanilla.

In a stand mixer, whip all the eggs, and the remaining 1 ¼ cup of sugar on high for a few minutes, until fluffy and light.

Now preheat the oven to 350 degrees.

Stir in the chocolate mixture and softened butter until completely combined.

Add a bit of the flour mixture, and a bit of the buttermilk mixture alternately into the sugar mixture in the stand mixture, starting and ending with the flour mixture. Stir until combined, no more, no less.

Scrape the sides, and mix a little to make sure everything is combined.

Pour the batter in equal shares into the two prepared cake pans, and bake in preheated oven for at least 25 minutes, checking to see if done after a 25 – 30 minute period.

Doneness is reached when toothpick inserted in the middle comes out with only a few crumbs.

When done, flip cakes over, still in their pans onto cooling rack, peel off the parchment paper. Then flip right side up on the racks and let cool completely before frosting, a couple hours.

Level the tops of the cakes with a knife.

Heat heavy cream and butter in saucepan on medium heat until it just begins to boil. Make sure butter is melted. Return heat to low, and stir in corn syrup, and sugar, until sugar is dissolved. Add vanilla.

Pour hot mixture over chocolate chips in a medium metal bowl, and stir until chocolate is melted.

Place chocolate mixture in bowl in a ice bath, and stir until frosting thickens and cools. Take out of ice bath and whip with a beater until it is light and fluffy.

Spread the recently whipped chocolate filling thickly onto the top of the bottom cake layer. Keep the frosting half an inch away from the sides.

Place the other half down on-top, and press firmly down. Place in fridge while you go on to the next step:

Place all Frosting Ingredients (softened butter, milk, vanilla, powdered sugar, and 3-4 drops red food coloring) into a tall small bowl, and whip until thick. I used about 3-4 drops of the red food coloring to turn it light/dark pink, but if it has not reached that shade as shown in the main picture, then you can put a few more drops in.

Spread a thin layer all around the cake first. This is called the crumb layer.

Place in the fridge at this point for twenty to thirty minutes.

Take out after duration, and coat with a thicker coating of the pink frosting.

You can get a tube of green decorative icing at a grocery store easily, they just are relatively expensive.

First, with a toothpick, sketch out the letters on the cake. Then carefully tube out the green stuff, drawing “HAPPEE BIRTHDAE HARRY” on the cake like so. (see picture).

Place in fridge until ready to serve.


____________________________________________________


For all step by step pictures, go see my original post of this recipe on instructables.

See a few of the pictures below:

icing-harrys-cake-1
middle frosting
icing-harrys-cake-2
top pink frosting
icing-harrys-cake-3
green words on-top


Bacon-Wrapped Eggs for Breakfast

This sort of redefines the term ‘bacon and eggs for breakfast’. Each egg muffin is wrapped with one piece of bacon, and baked in muffin tins. This makes a perfect breakfast for any morning, and has countless variations.

See my original post of this recipe on instructables.

bacon-wrapped-eggs-mainbacon-wrapped-eggs-second-main

Ingredients: (serves 8)

8 pieces raw bacon strips

8 eggs

Sprinkle of salt

Sprinkle of pepper

⅓ cup shredded cheddar cheese


DIRECTIONS:

Shred the cheese and set aside.

The goal is to undercook the bacon so that it is still very flexible and not crispy. Preheat oven to 375. When heated, place bacon in for about 10 minutes. Take out of oven.

When bacon is cool to touch, place them (as shown) in the muffin tins. Preheat oven to 400 degrees.

Crack each egg into the bacon-wrapped tins. Sprinkle over with salt and pepper and shredded cheese.

Place in preheated 400 degree oven, and bake for a little over 15 minutes, or until eggs are fully eggs are fully cooked, and bacon is crispy.

Serve warm.


…and, thanks to some of the comments and feedback I’ve received on my original post of this on instructables, I’ve inserted a couple ideas/variations:

1. Make an omelette variation on this: whip the egg with shredded cheese, half and half, and vegetables, or maybe some Feta, and cook it up the same way, wrapped in bacon, for a nice twist on breakfast.

2. For a more full-on variation: Add raw hash-browns to the bottom of the muffin tins, or some…pancake batter, and do everything else the same way.

3. Or you could always do a combination of those two. There are many many ways to change around this recipe.


raw egg bacon wrapped.jpg


Raspberry Scones with Almond Glaze

Raspberry Scones are not only a perfect treat for summer, but all year round. The raspberries should not be fresh, but rather frozen. Finish them off with a bit of complimentary Almond Glaze.

raspberry-scones-main


Ingredients: (makes 8 scones)

2 ½ cup flour

1 teaspoon baking soda

½ teaspoon salt

2 teaspoons cream of tartar

3 tablespoons sugar

1 cup buttermilk

¼ teaspoon almond extract

12 tablespoons unsalted butter, frozen

¾ cup frozen raspberries


For Glaze:

¾ cup powdered sugar

3 tablespoons milk

¼ teaspoon almond extract

1 tablespoon butter, melted


DIRECTIONS:

Preheat oven to 375 degrees. (If using convection, preheat At 350).

In a large bowl, quickly whisk together the flour, cream of tartar, salt, baking soda, and sugar.

In a small bowl, mix together the buttermilk, and almond extract.

With a food processor on the ‘shred’ setting (like for shredding carrots and other vegetables), shred the frozen butter.

Cut these shreds into the flour mixture in the large bowl.

Fold the sour cream mixture into the flour mixture until just combined. If it is too dry, then add 1 -2 tablespoons of milk until moist. Be careful to mix just until combined. Do not over work the dough.

Then dump in the raspberries, and fold those in carefully. Don’t worry if the raspberries break up too much, they’ll still be fine.

Turn the resulting dough onto a piece of parchment/wax paper. Carefully shape dough into an 8-inch circle, ¾ inch thick. Be careful not to overwork the dough.

Cut out 8 pieces like you would a pie.

Place these 8 pieces onto a baking sheet, brush the tops over with some milk, and bake in preheated oven for about 15 minutes or longer, until the scones are golden.

Meanwhile, be making the almond glaze, by beating all the glaze ingredients together (powdered sugar, milk, melted butter, and almond extract).

If the consistency is too thick, add a tiny bit more milk. If it is too runny, add more powdered sugar.

Drizzle over baked scones.

Serve warm.


See my original post on raspberry scones on instructables.

raspberry-scones-dough-ingredientsalmond-glaze-ingredients

shredded-frozen-butter
Shred Frozen butter…
roll-out-rasberry-scones
…shape into a ball